It all started with one of those random little moments with friends.
One day, my buddy Floydfish messaged me out of the blue and asked if I was interested in the PXIe-5644R. At that time, I had absolutely no idea what that thing even was. So, I looked it up—and huh, turns out it’s actually pretty interesting.
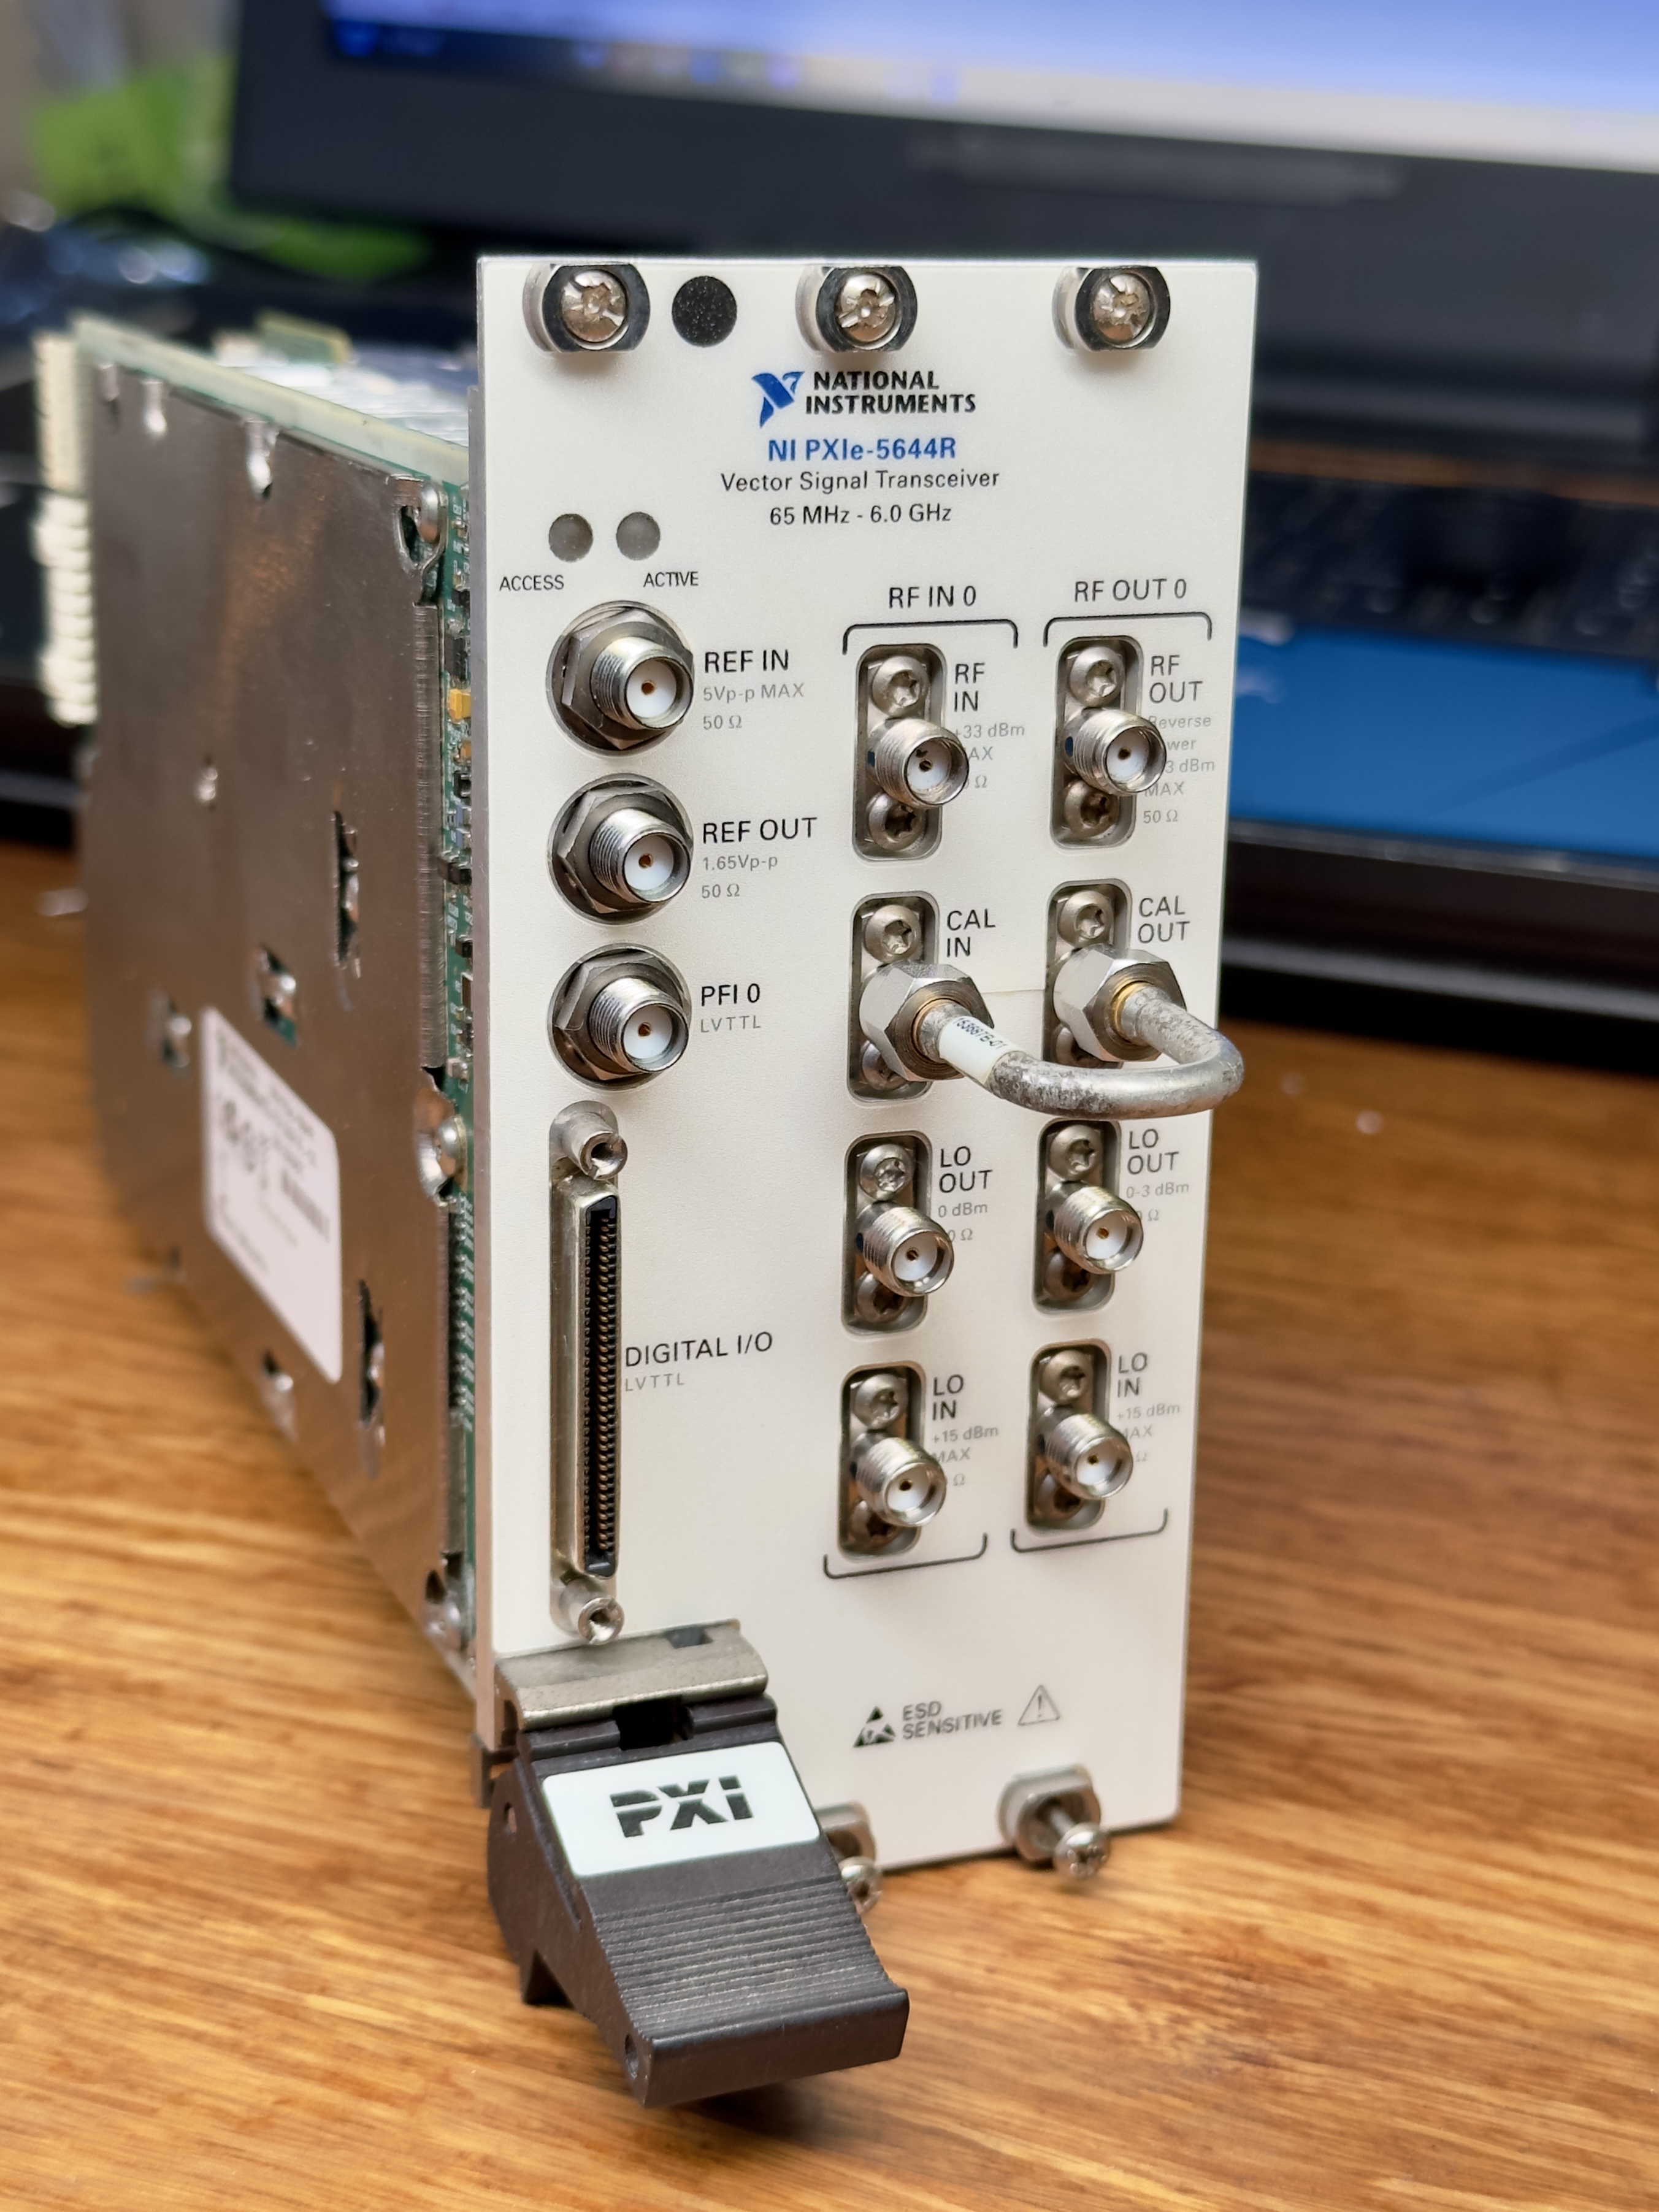
So, what’s the deal with the PXIe-5644R ?
Think of it as one of those “all-in-one” boxes that RF engineers get a little too excited about. Officially, it’s called a Vector Signal Transceiver (VST), but basically it’s a mash-up of a signal generator, a spectrum analyzer.
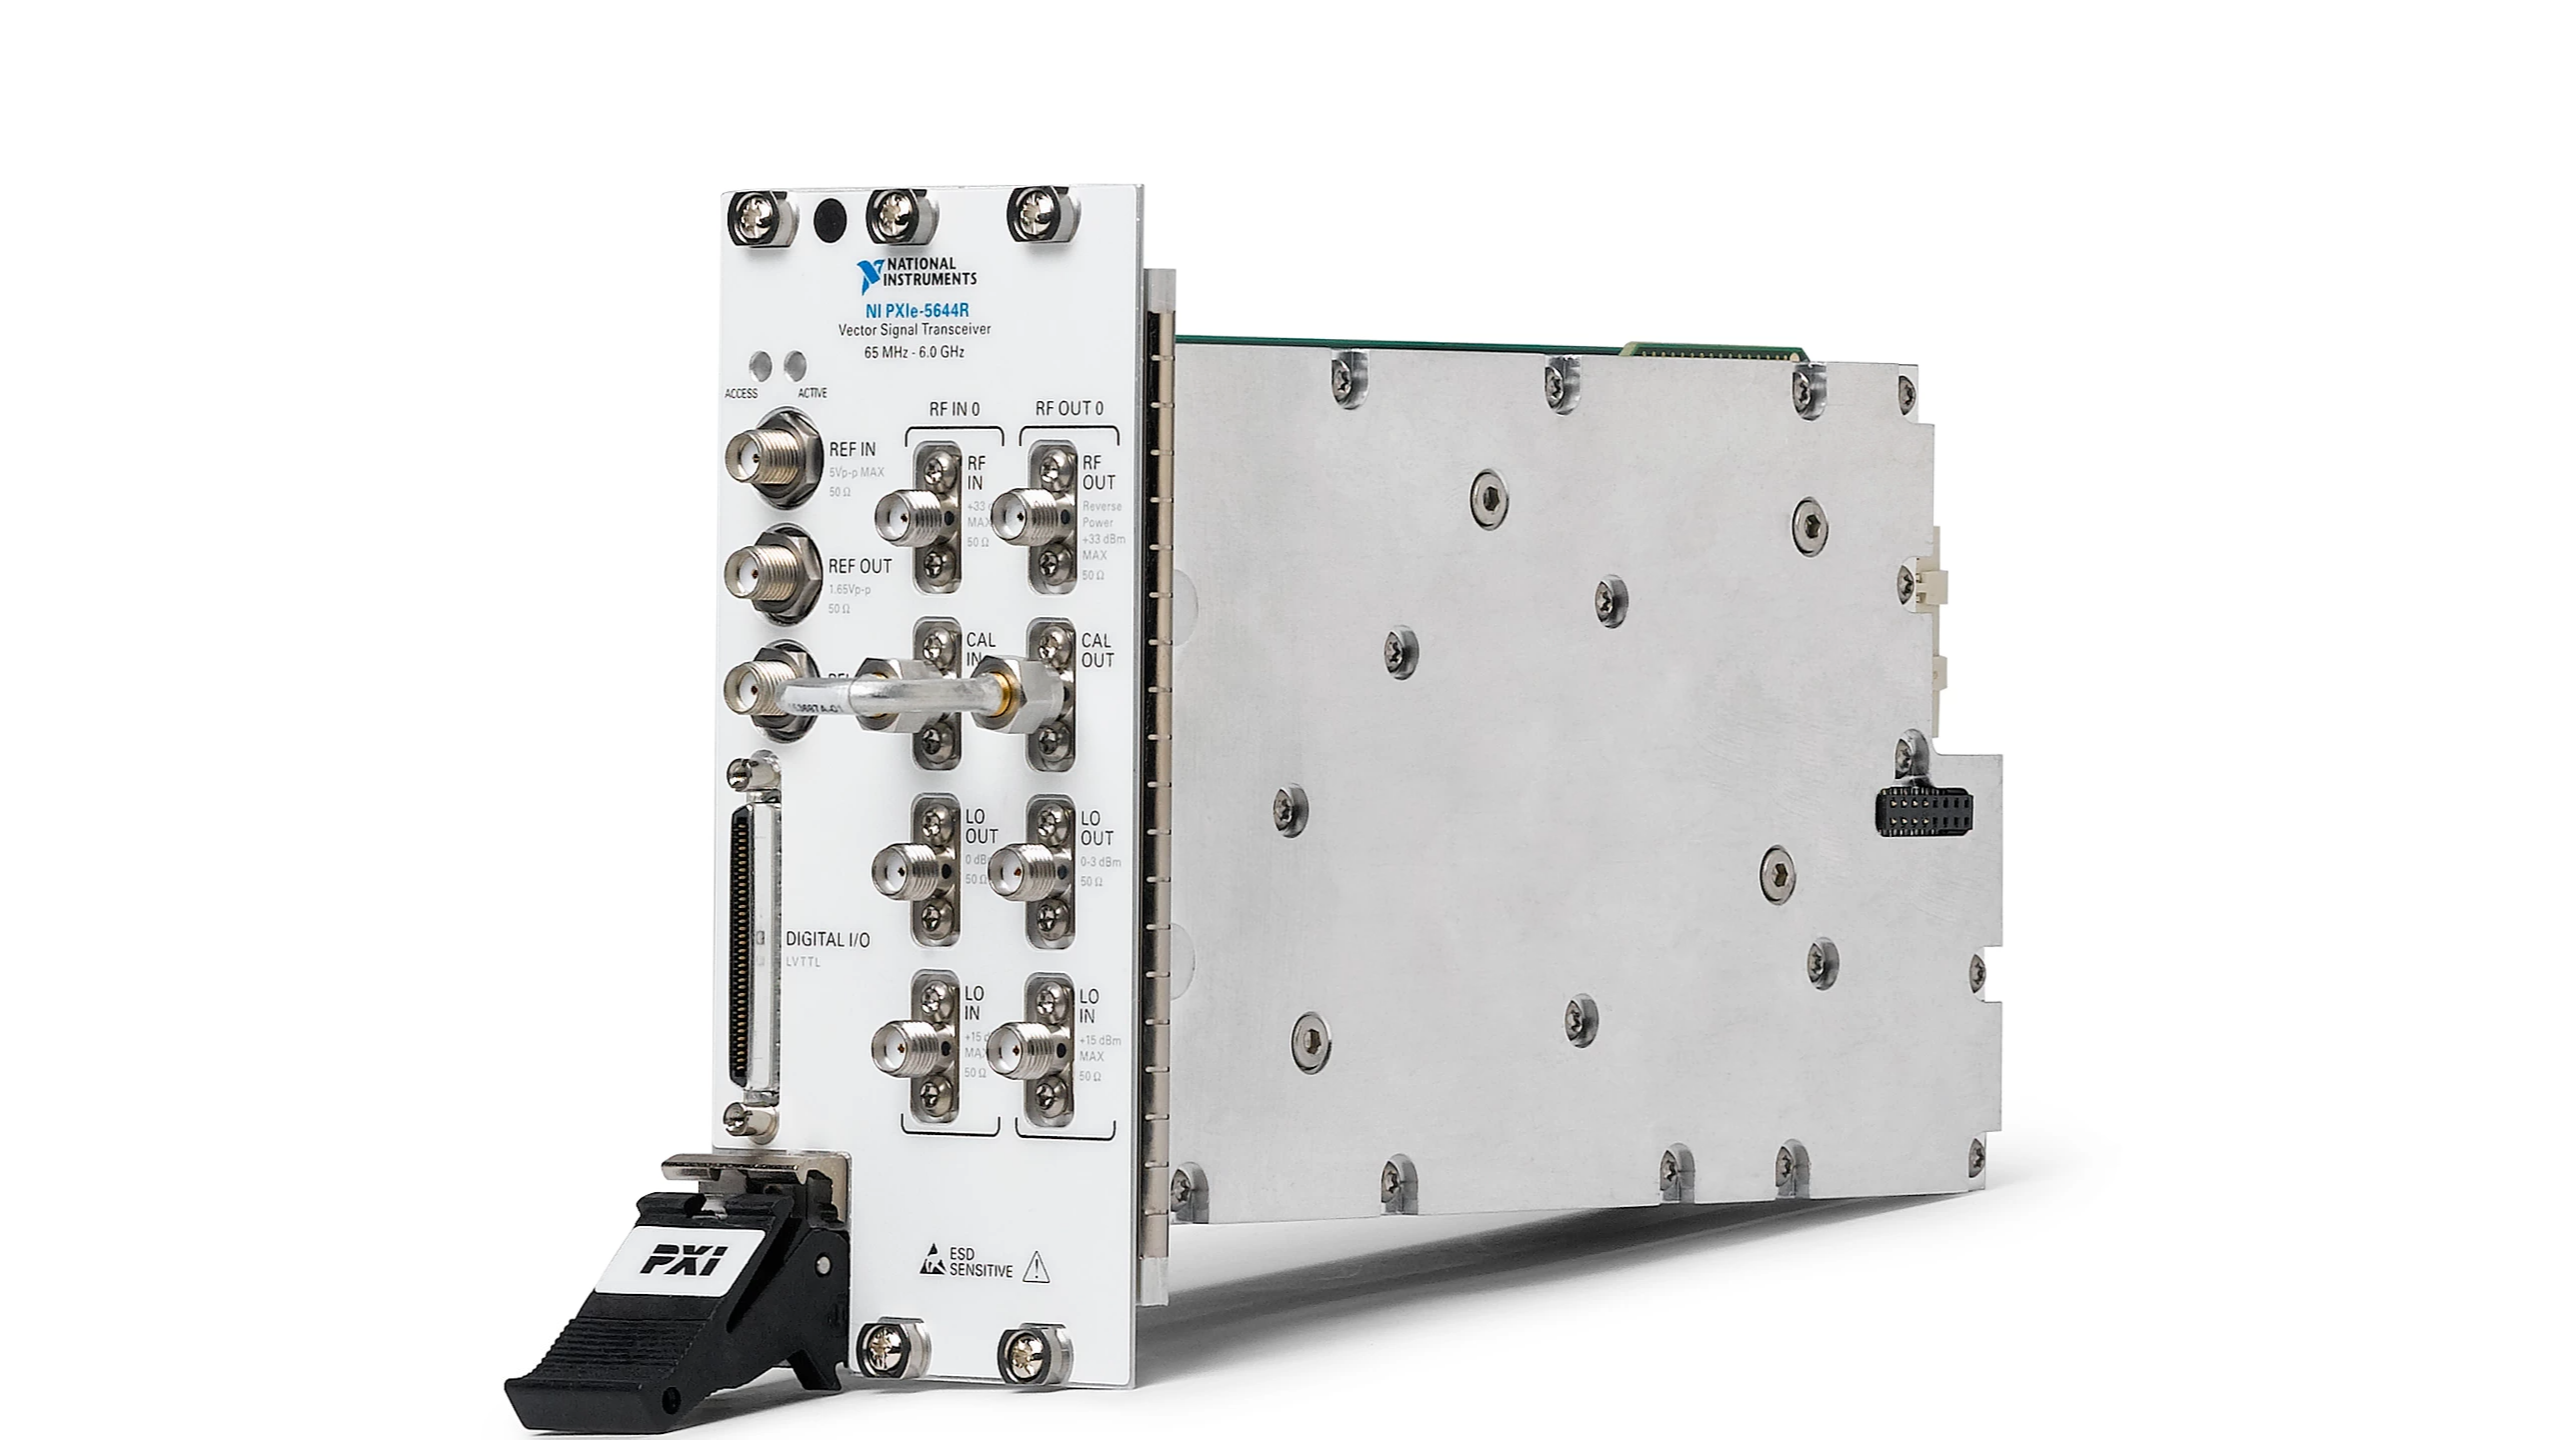
That combo makes it super handy—generate signals, measure them, all inside the same box. I think we can call it a SDR device or Software Defined Radio. Unlike the AD936x based stuff that uses ADI’s integrated RF transceivers, the PXIe-5644R is in a whole different league—it’s proper instrument-grade. That means the signals it generates or captures aren’t just “there,” they’re actually good enough for quantitative analysis.
We’re talking about things like phase noise, stability, and amplitude accuracy—all way beyond what the AD936x series can offer. And that’s exactly why I find it so fascinating.
Of course, it’s not exactly pocket-money cheap, it costs me about CN¥2500 (~350 USD). But once I get it in my hand, I finally realize it is so cheap for that performance.
Floyd’s idea was basically that we could buy a small batch together and split them up, so everyone could finally have a decent RF instrument instead of just relying on SDRs, which never really feel that reliable for actual RF measurements.
We spun up a group chat. That’s also how I first met my friend Squirrel. He got that nickname because, well, he loves hoarding stuff—not just instruments, but also electronic components. Whenever he sees a good deal, he stocks up like crazy. And honestly, sometimes that works out really well for him. We hit it off right away since we all had similar hobbies and interests, and the conversations just flowed naturally.
The Hardware
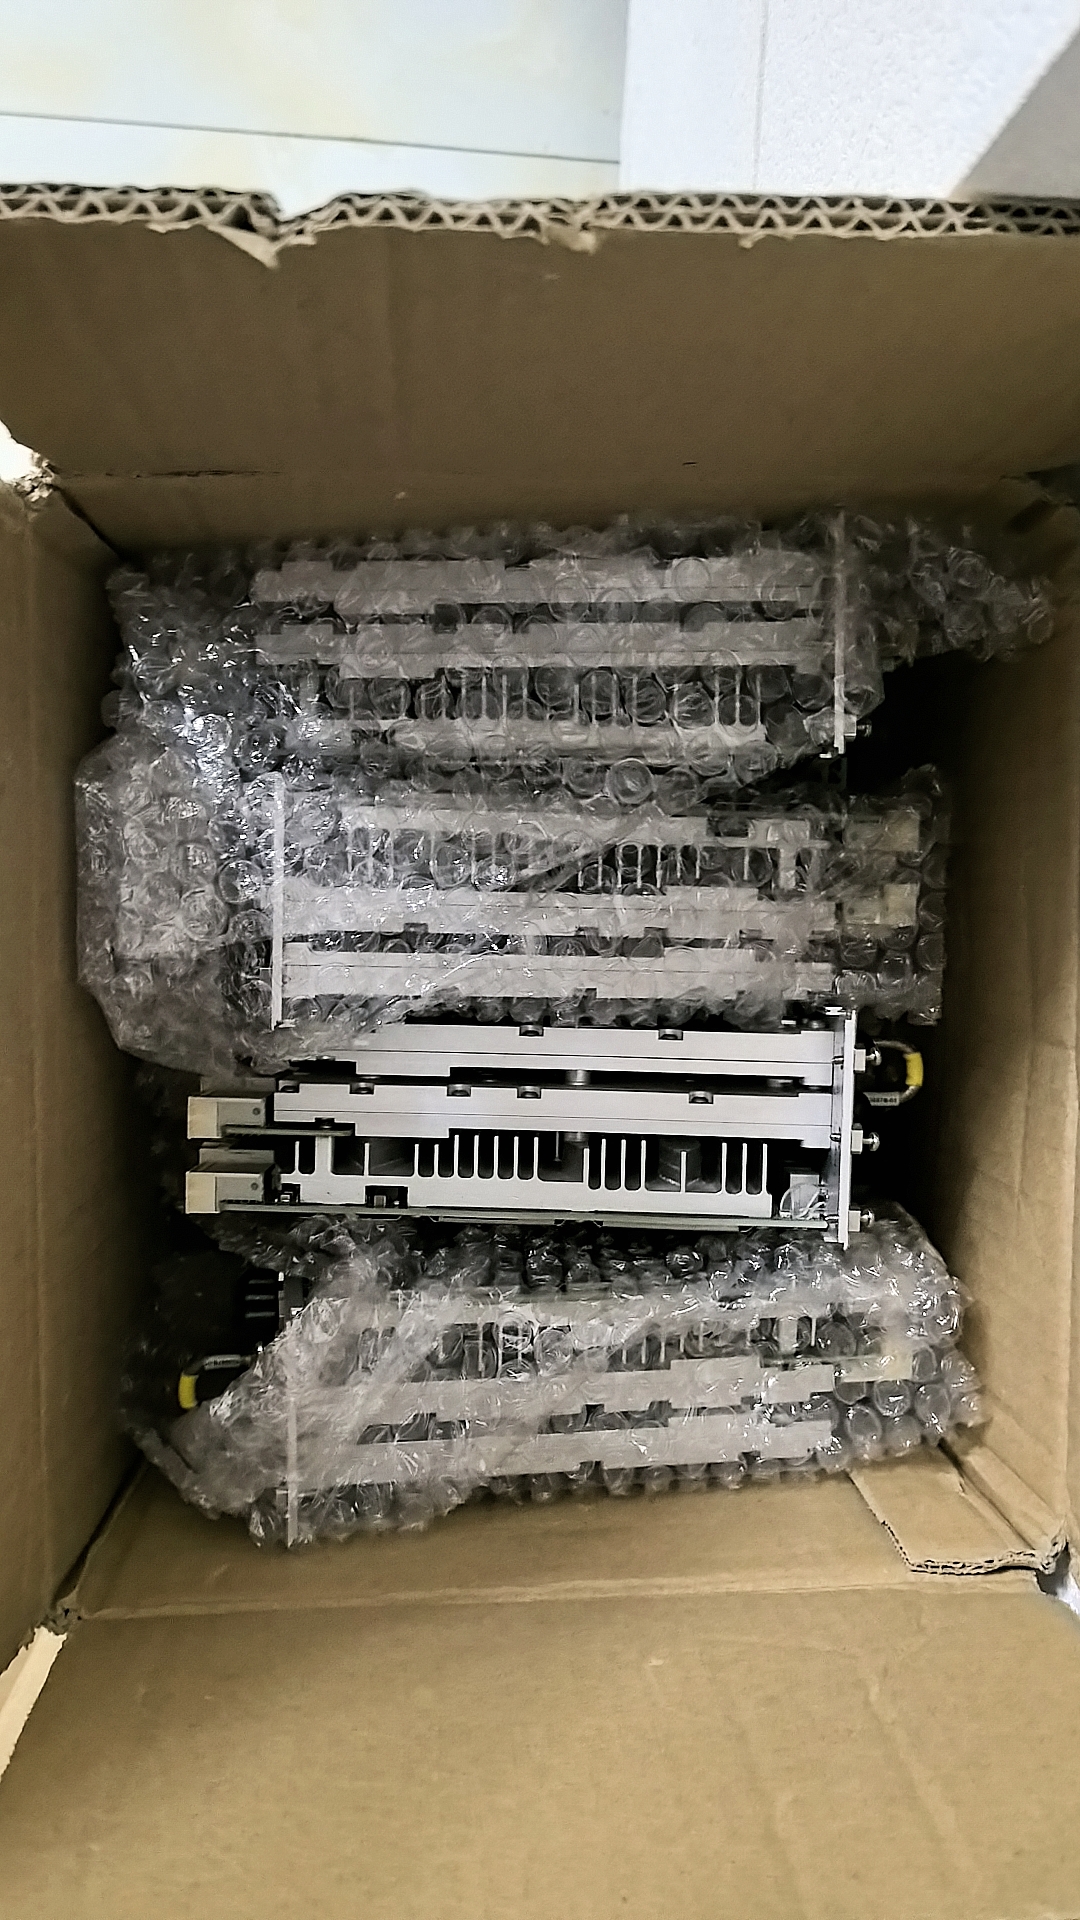
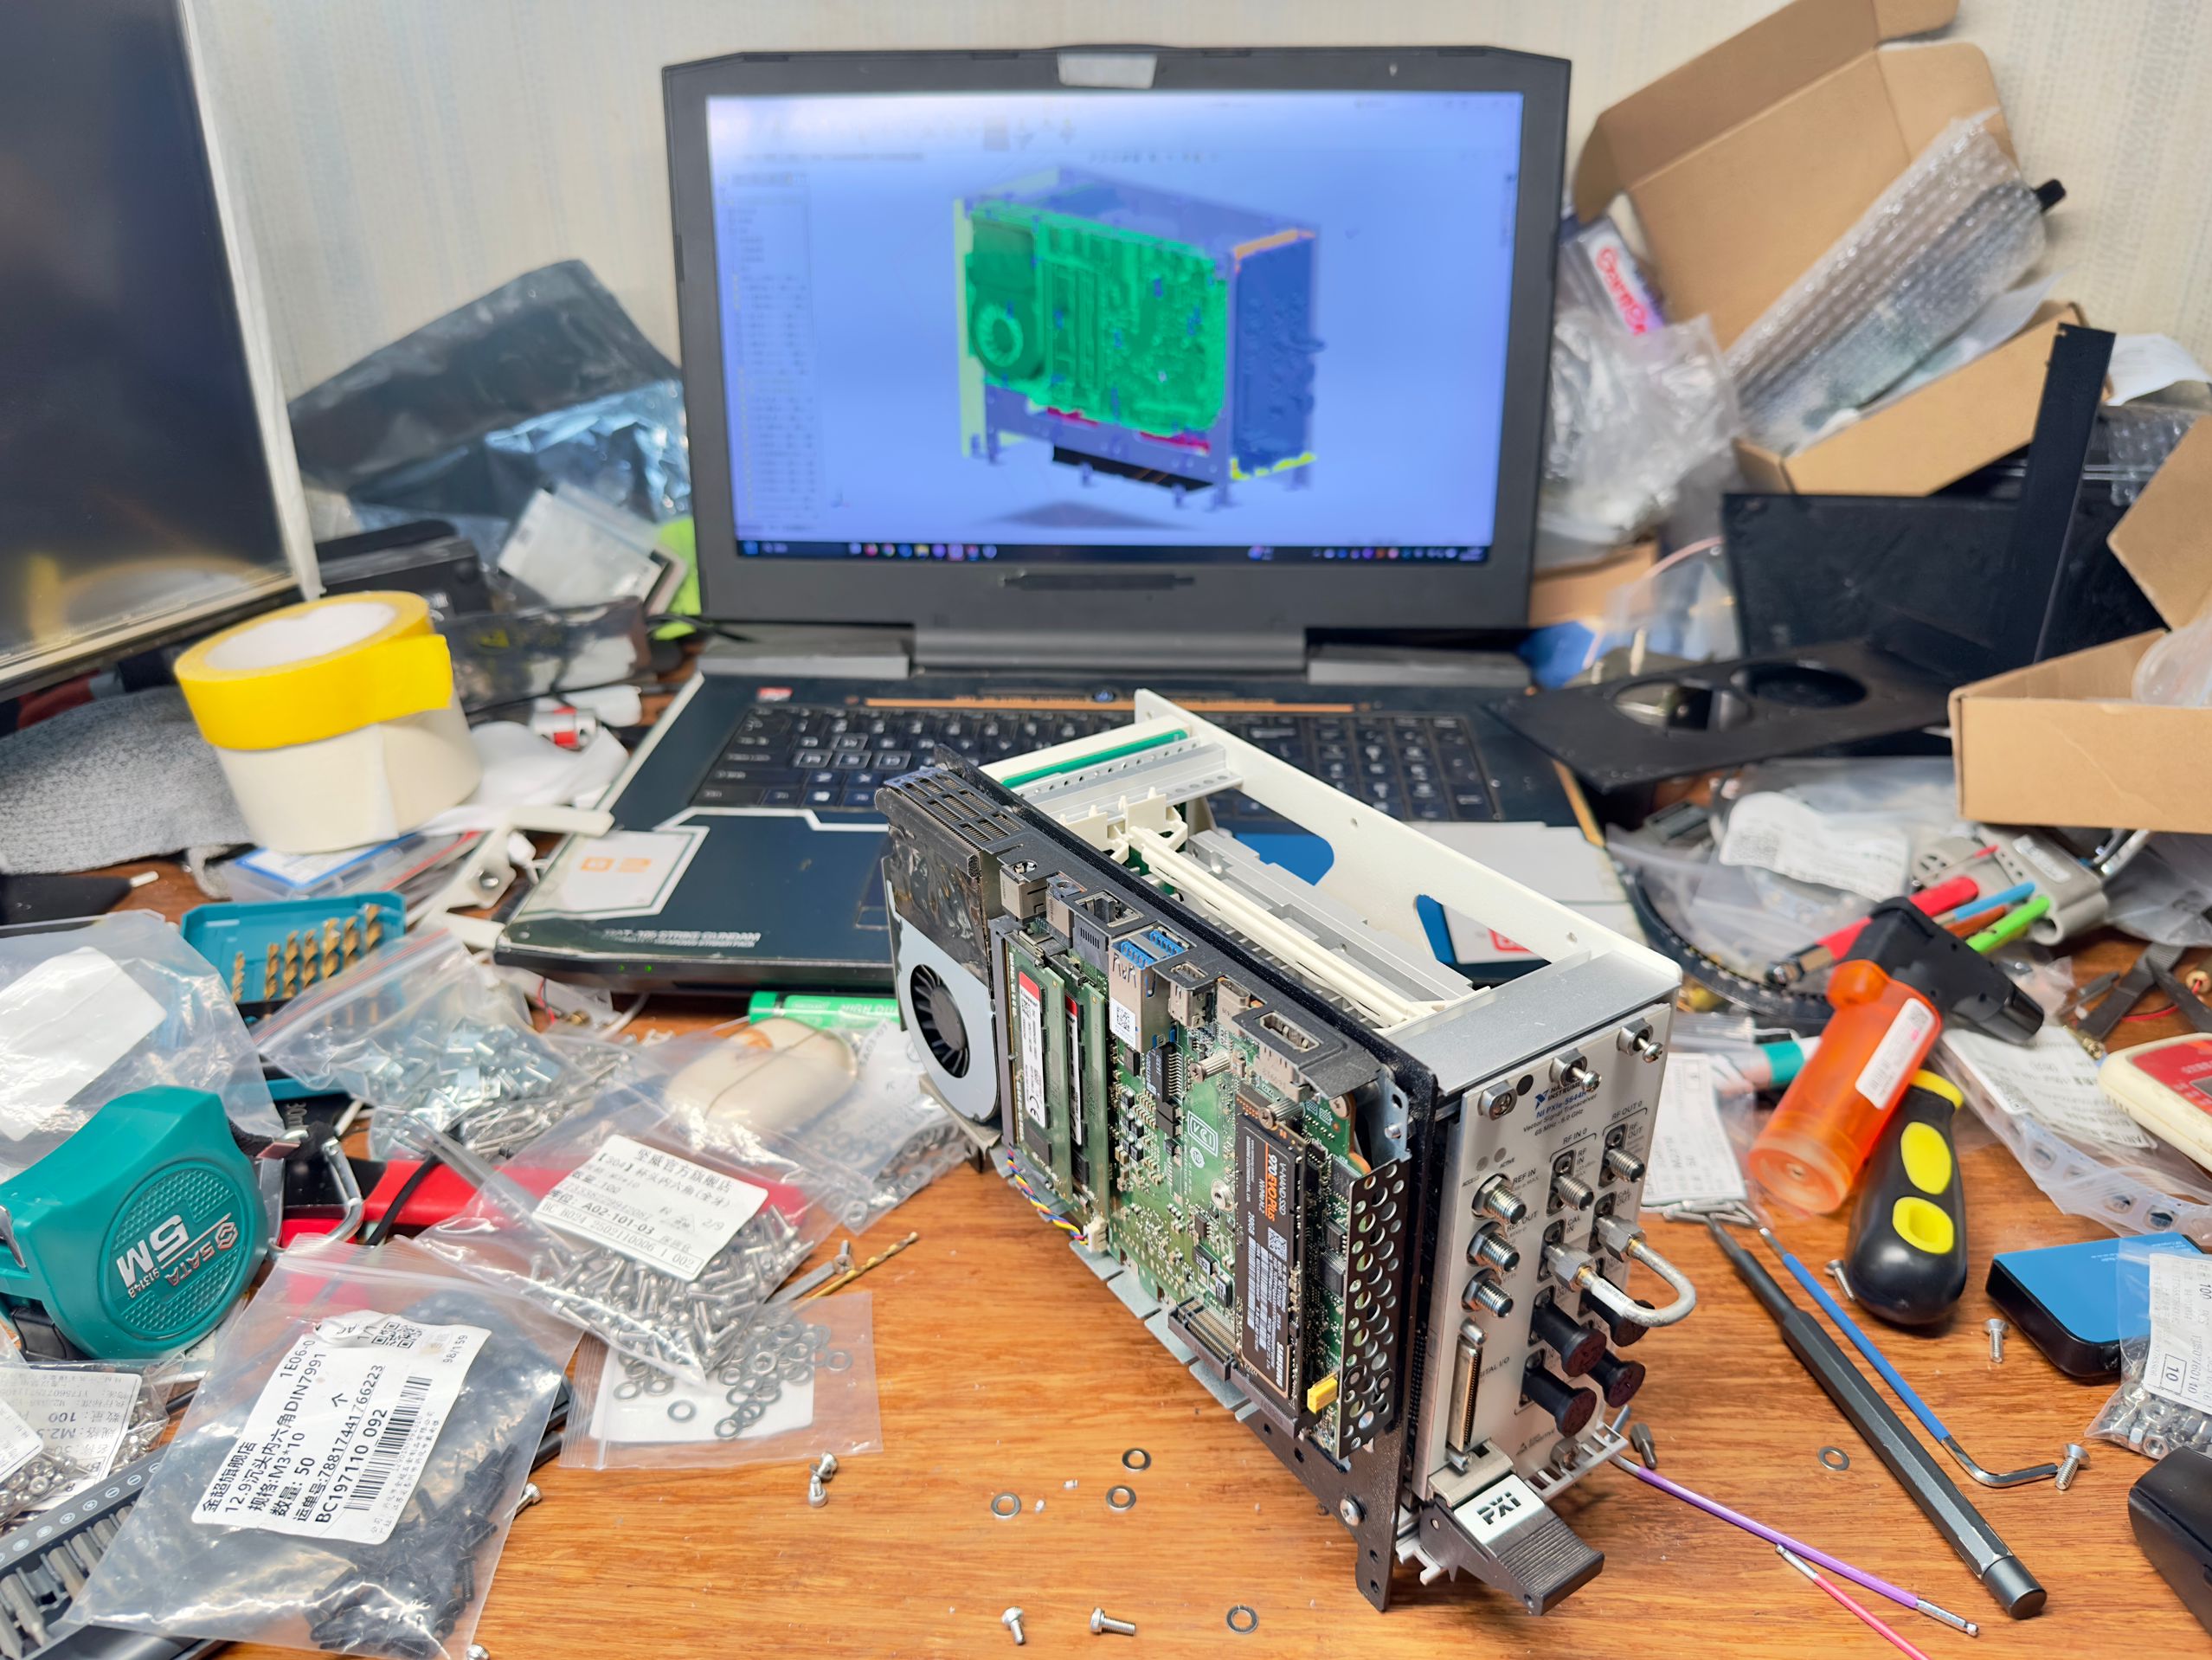
Pretty soon, Squirrel sent me the package. Before shipping it, I had him run a self-calibration to make sure everything was working properly. This is how it looks like when I get it in my hand. There was a bit of dust on the surface, but I blew it off and brushed it a bit, and now it’s sparkling clean.
Alright, so now that we’ve got it in hand, the real question is—how the heck do we actually get it running?
Usually, most people would just get a case for it (e.g. PXIE-1061/1071). The smallest one has six slots, and this thing eats up three of them. On top of that, you’d need an x86 controller to run it. By the time you add the case and the controller, it ends up costing way more than the RF module itself, easily a few extra thousand RMB.
Luckily, since this thing is pretty common on second hand markets, a lot of people have already managed to run it on its own. PXIe is basically just a variant of PCIe, so for some devices that don’t need the special PXIe signals, you can actually get them running just by connecting them to a regular PCIe data link. There is a very nice post on Hackaday which clearly demonstrate how people run it with their own chassis.
But I wasn’t really interested in cramming it into a desktop chassis. My idea was—could I shrink it down to roughly the size of the module itself? And maybe even connect it straight to my laptop with a single Thunderbolt 3 cable. That way, I could just pull it out when I need it and tuck it away when I don’t.
The main reason I wanted to do all this is that I’m an international student, flying across the ocean multiple times a year. I can’t really carry a ton of gear, so having key instruments that can travel with me means I can deploy most of my productivity wherever I go.
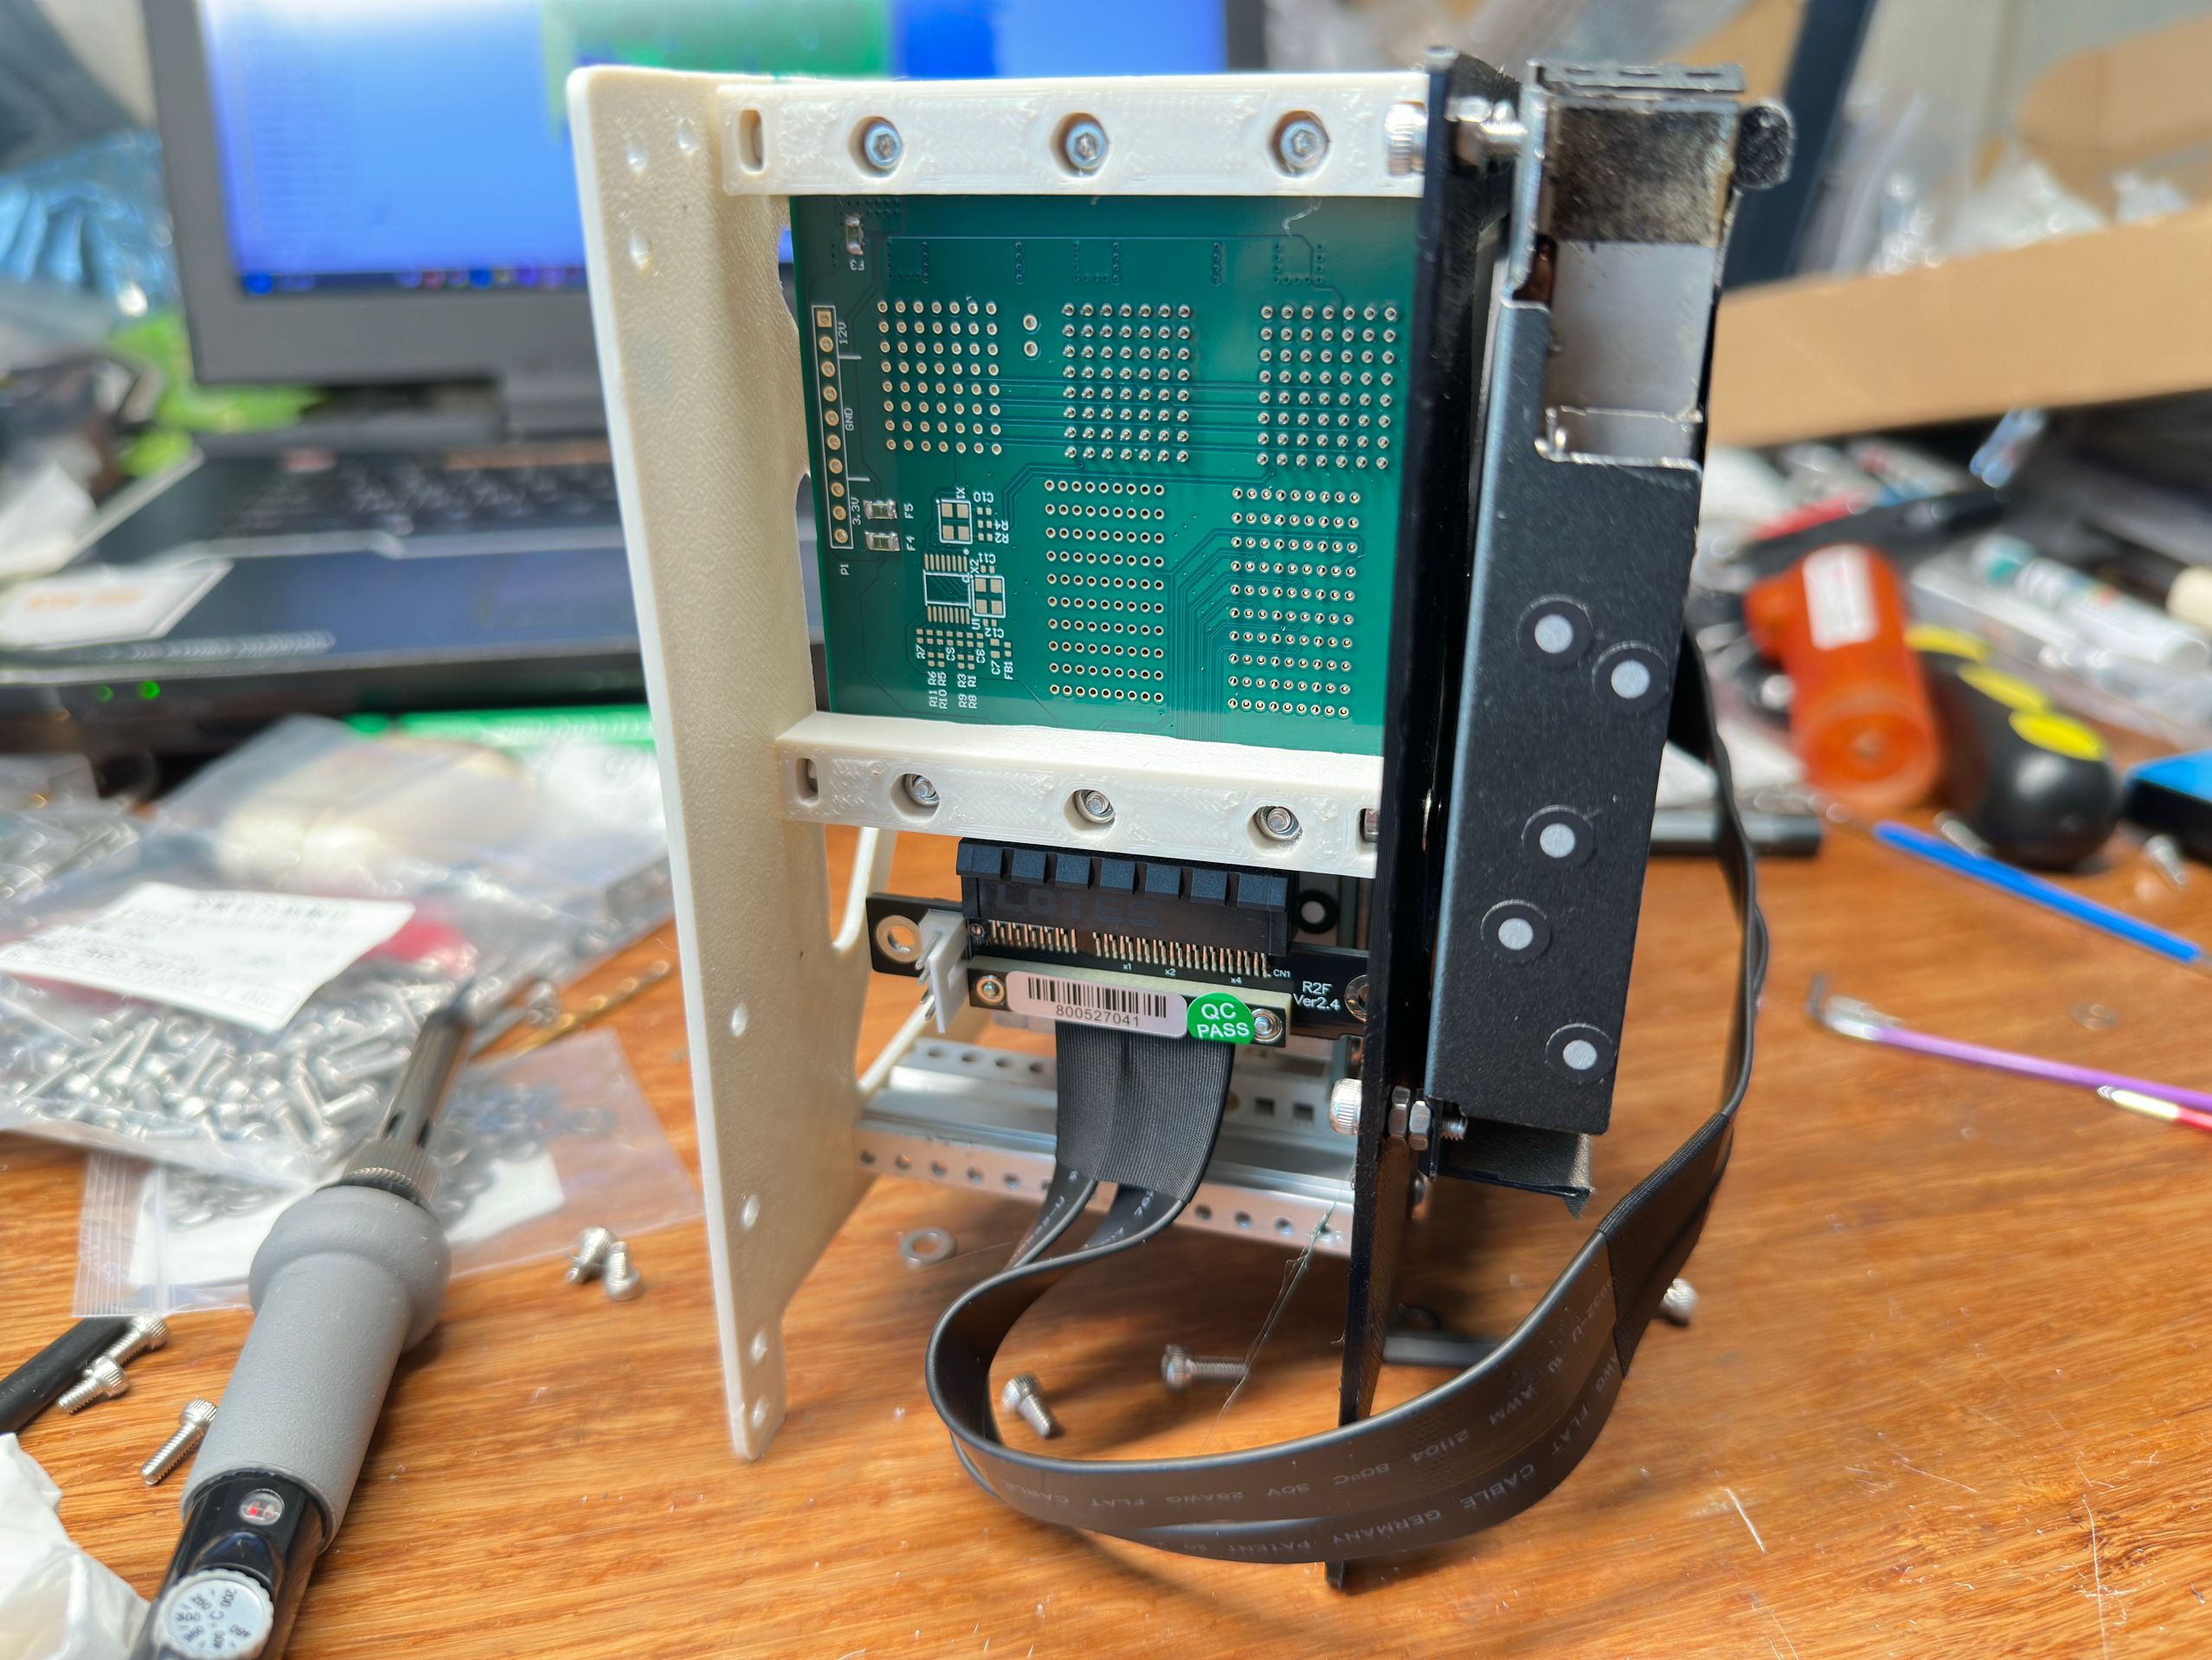
Squirrel is a PXIe PRO—he used to work for Rigol (yes that’s the company made cheap oscilloscopes), so he knows all the ins and outs of instrument hardware. He even built his own PXIe controller before—and it actually worked! When I told him my idea, he offered to make me a PCIe-to-PXIe adapter board. I’m honestly super grateful to him for that.
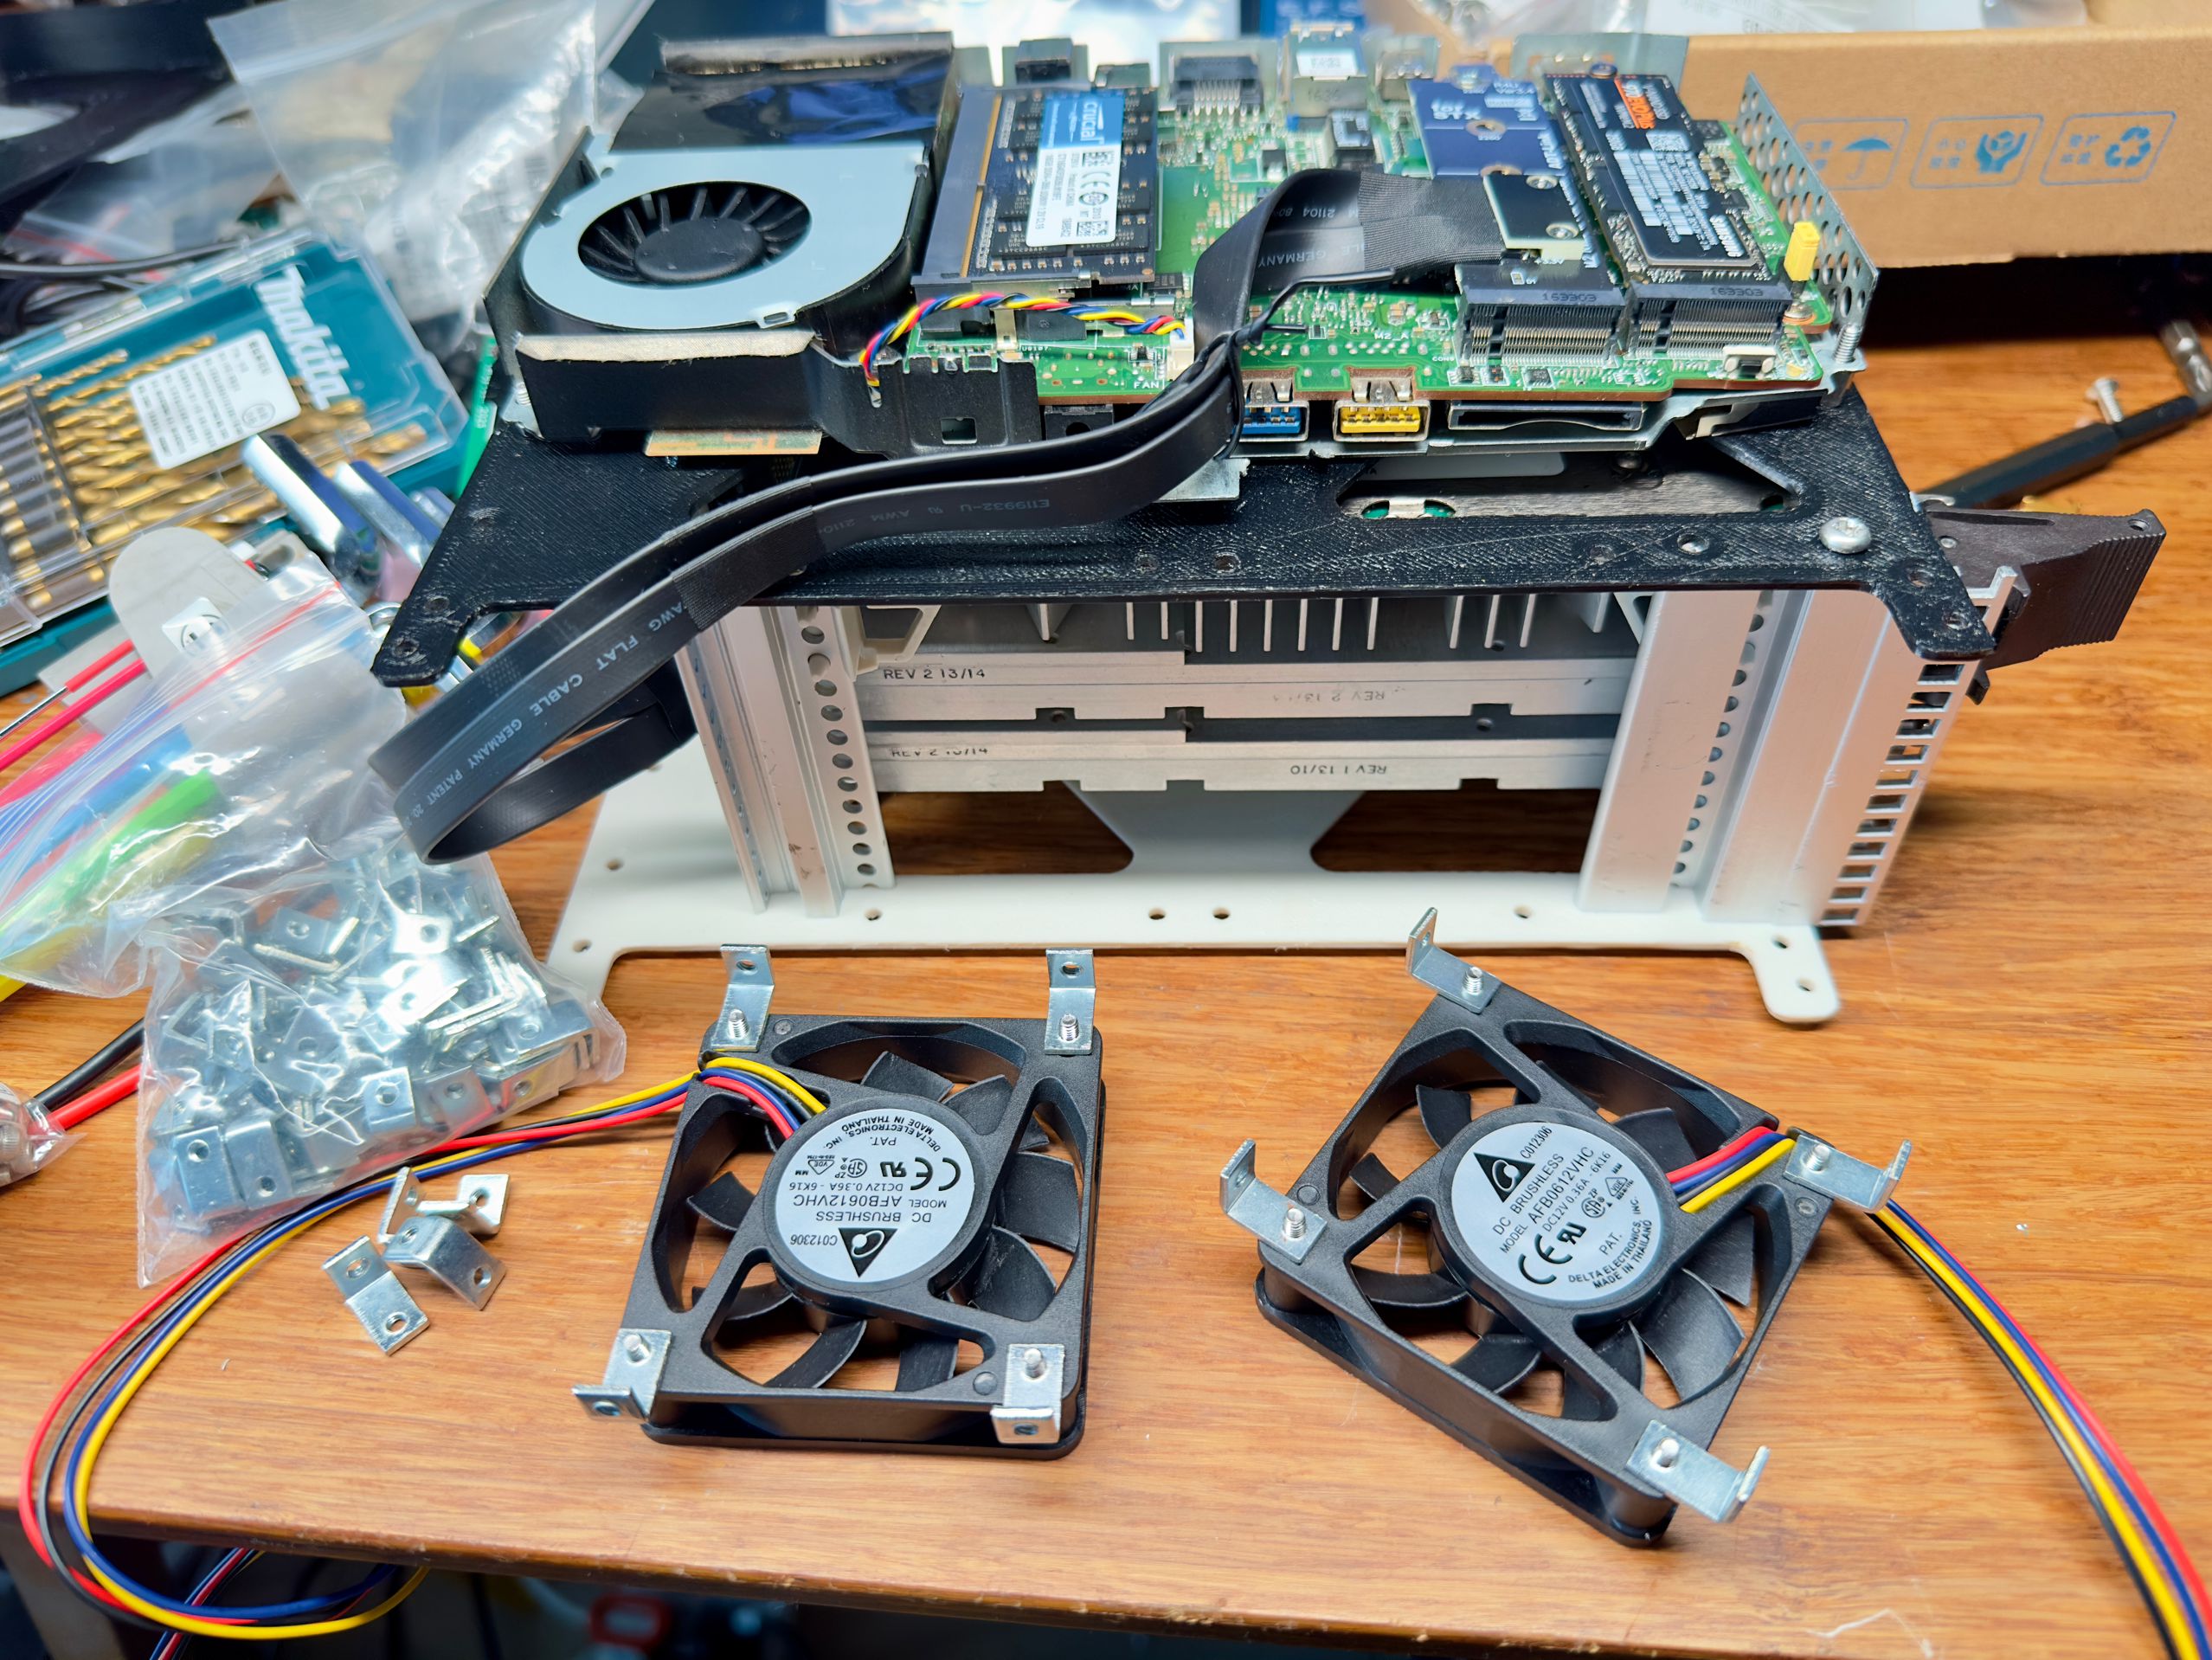
He also made a set of installation tools. Since PXIe connectors are press-fit, you need proper jigs to avoid damaging the plastic casing when pressing them in. Once everything was ready, he sent me another package.
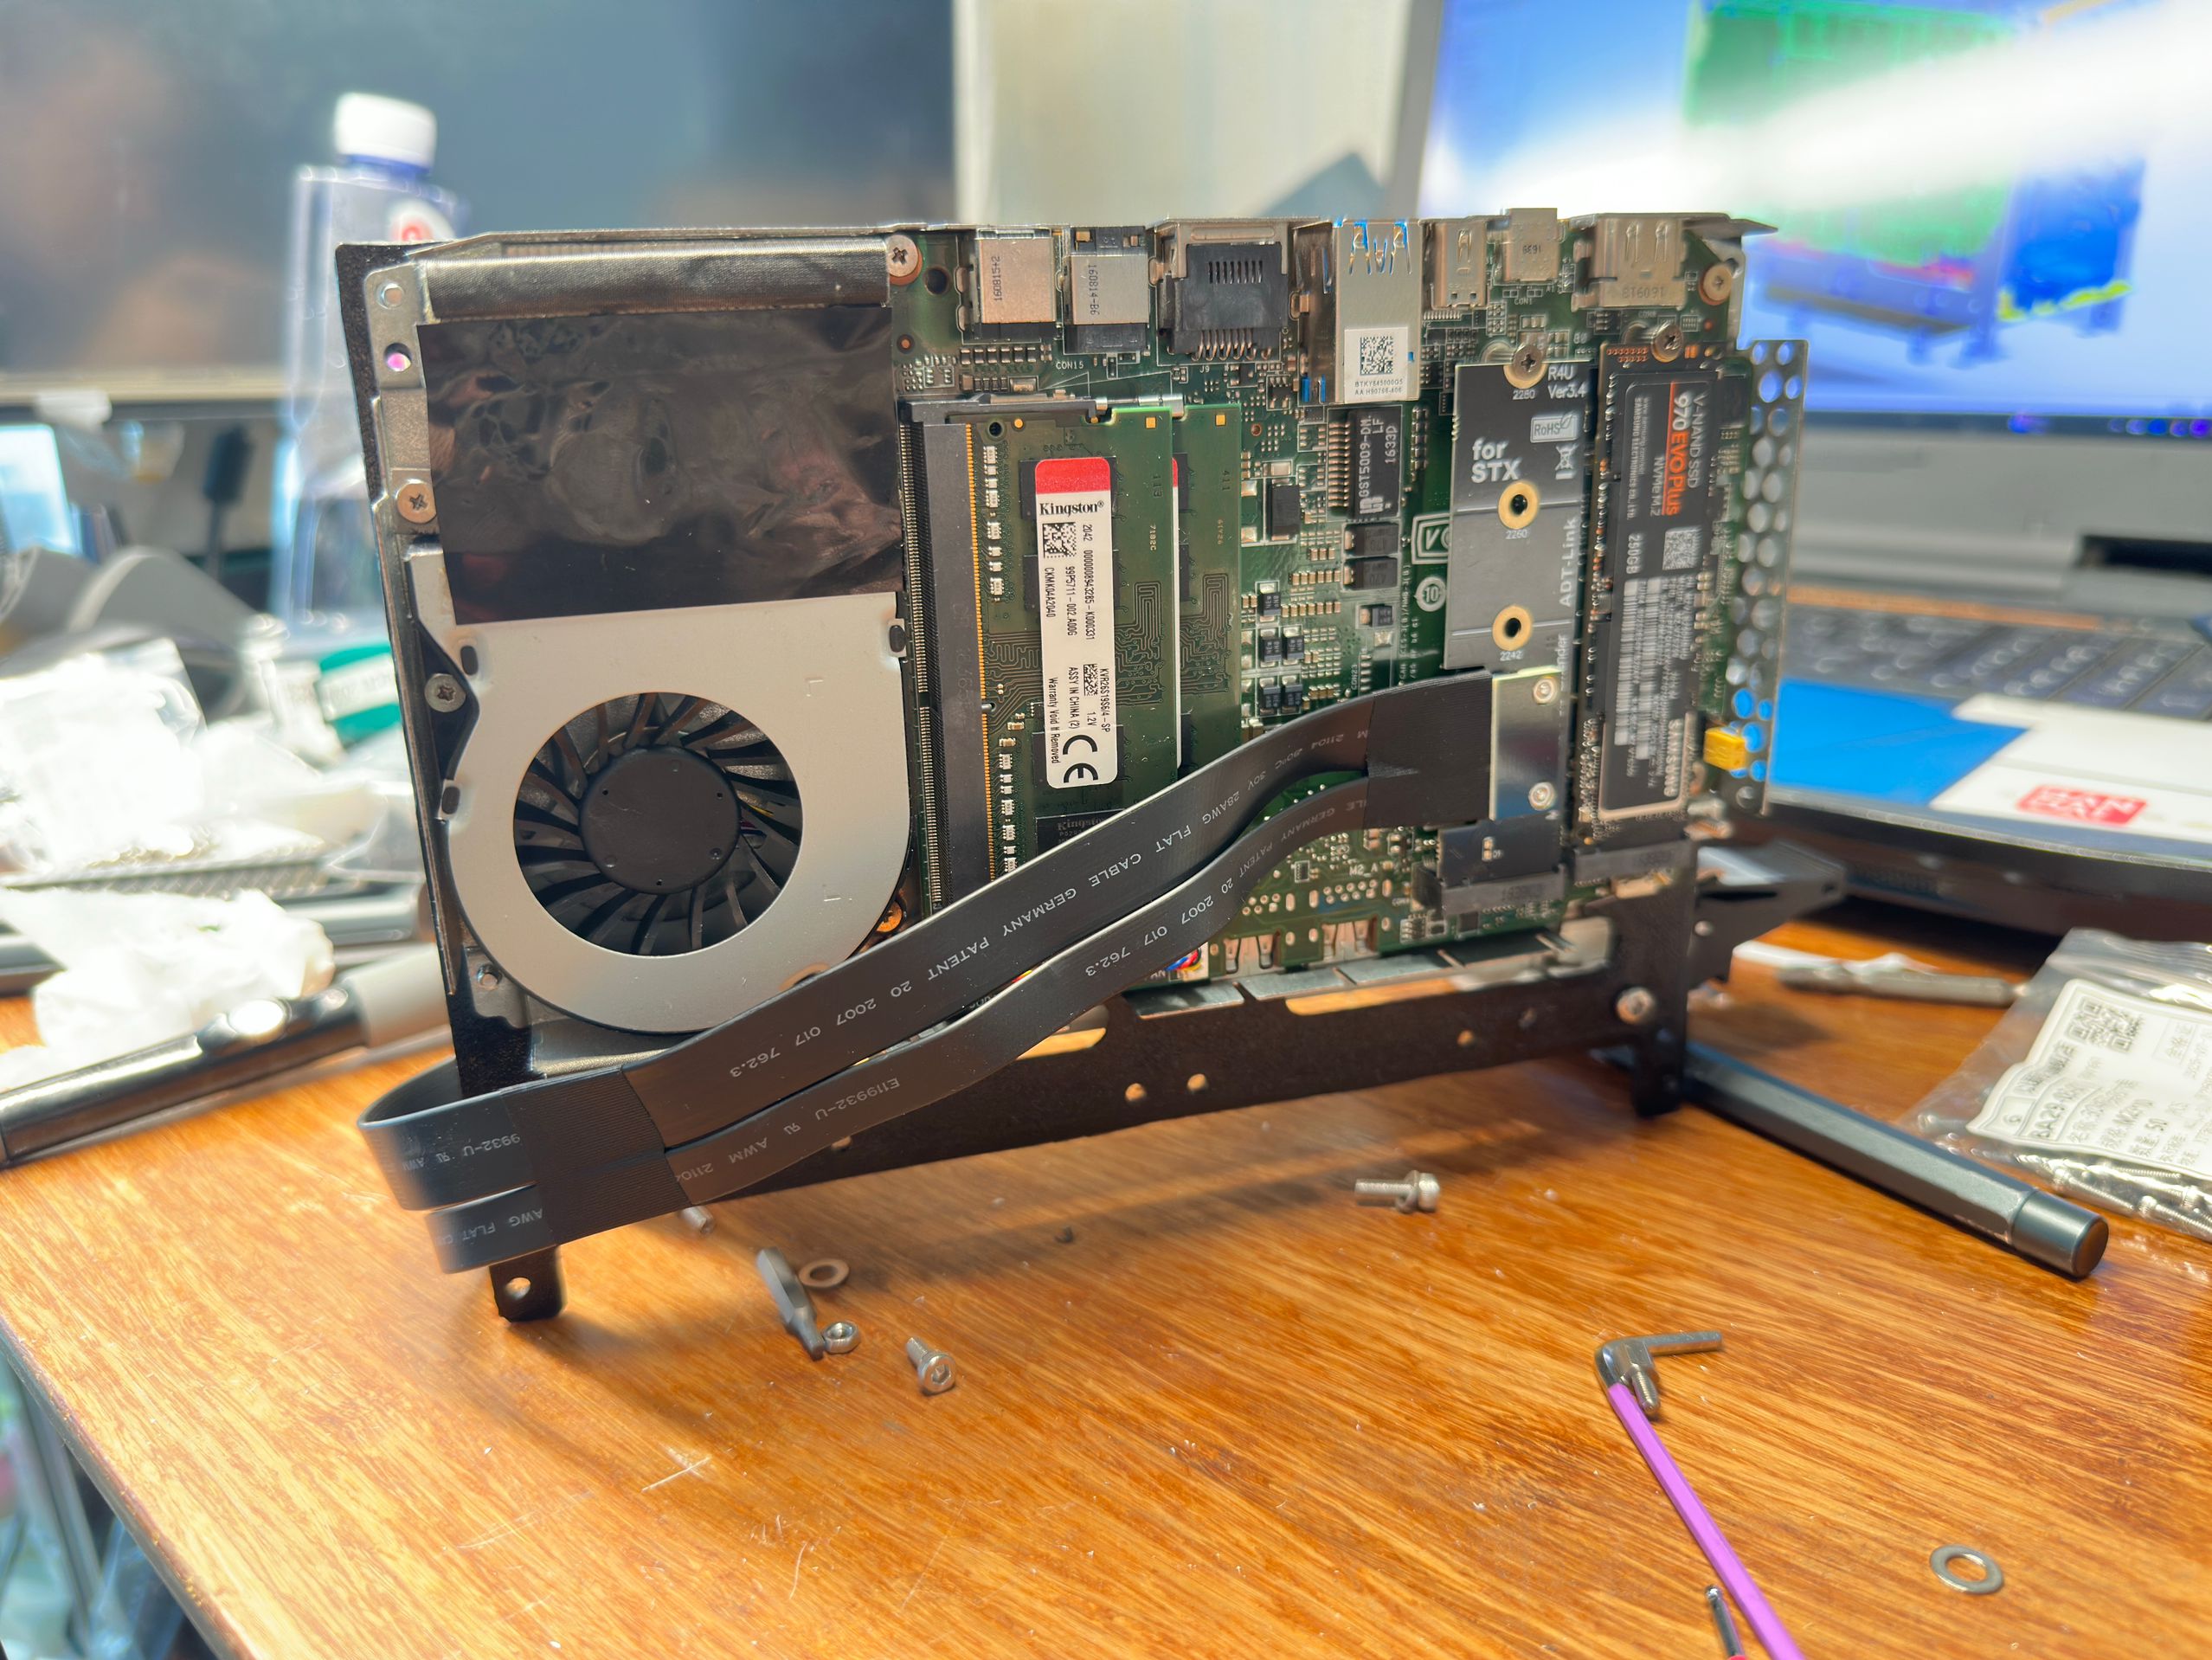
Since the 5644R only actually uses one PXIe slot (even though it has two, only one carries signals) and two power slots, Squirrel’s board only had those installed. Of course, he left the other slots open for future designs, just in case other cards might need them. I also had a custom adapter made—a male M.2 to PCIe slot cable. It was made by a company called ADT-Link, which specializes in PCIe adapters and extension cables.
I also got a little Thunderbolt 3 to M.2 gadget. It looks just like an external SSD drive enclosure, but it’s actually based on Intel’s 7440 solution—a universal Thunderbolt controller that can, in theory, connect to just about anything pcie. However, for various reasons, I never ended up using it. Squirrel mentioned that Thunderbolt 3 compatibility works best with CPUs before the 9th generation (ONLY INTEL CAN DO), and my laptop has an 11th-gen CPU, so it might not even connect. I just set it aside for now.

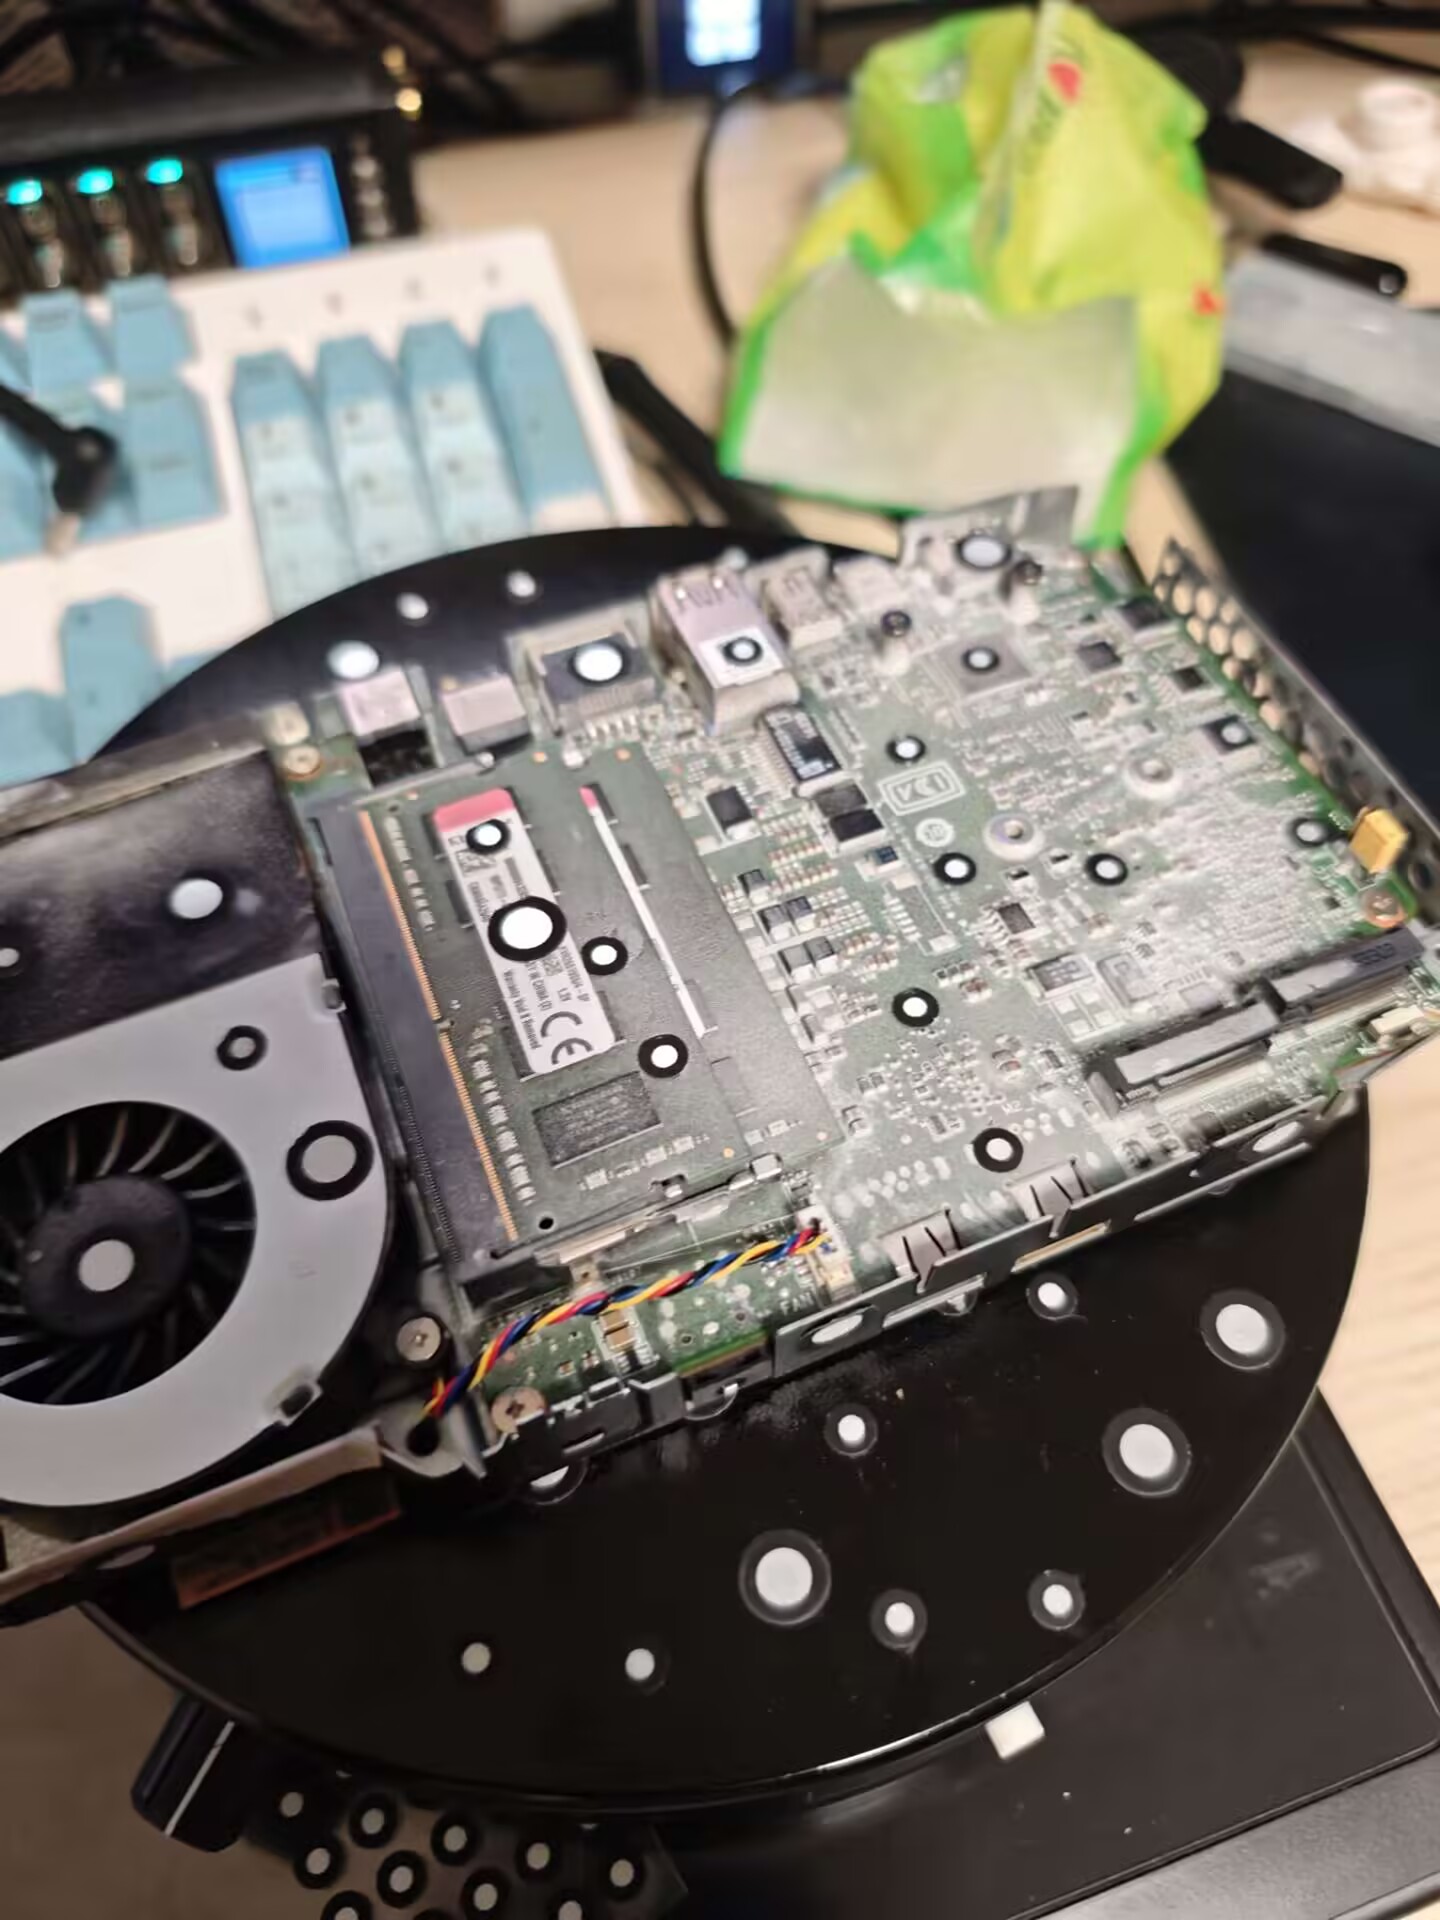
I ended up buying a second-hand NUC, model nuc6i7kyk
It uses Intel® Core™ i7-6770HQ Processor. I installed 16G of RAM that’s pretty enough. It has a wonderful Thunderbold 3 port. Dual M.2 slots and a ton of USB ports. The CPU is on the back side of the board and the heat sink is sticked together as a part of the enclosure, I wish to remove the metal plate but I can’t.

Alright, the last piece was the power supply, and I quickly put one together.
PXIe devices need two voltage rails—12V and 3.3V—with different current requirements. For the 12V, I used a second-hand industrial-grade power supply from Mean Well in Taiwan, which was super cheap. For the 3.3V rail, I built my own buck converter and did my best to minimize EMI and ripple.
All of my LTM power modules are samples provided by ANALOG DEVICES. Cheers to them! 🥂
I added a ripple filter at the output of the power board, consisting of three feed-through capacitors and an LC filter made from a ferrite bead and capacitor. Since the LTM power module switches at a relatively high frequency (around 2 MHz), such a filter can easily suppress the ripple, making a much cleaner 3.3 V rail. In my application, the 3.3 V supply only powers digital parts like the FPGA, which are not particularly sensitive to power noise. But since I had already built this, I decided to keep it in place.

Here’s the datasheet header of the mean well powersupply, I like mean well very much, every time when I need a good supply, I buy one from them. It’s rated at 80W 12V, 6.67A, with a ripple of 120 mVpp. Sounds not bat. The tricky part is finding a reliable power supply that can also keep the ripple under control, and this one does both.

Enclosures
Now that I had everything ready, I was planning to quickly put together a frame to assemble it and power it on. Before diving into 3D modeling the mechanical structure, I asked my friend Shirobato to scan the outer contours with a 3D laser scanner.
BTW, my friend Shirobato is a professional figure sculptor. He loves VRChat and Furry, and he’s made several furry figures that look absolutely amazing.
You might be wondering—why scanning? Doesn’t NI provide 3D models on their website? Well, they technically do. But when you download and open them, you’ll see it’s just the front panel—none of the internal aluminum exists. No idea what they were thinking.
For reflective surfaces, you need to spray a developer before scanning. These are usually quite volatile and disappear after about half an hour—perfect for use around sensitive electronics.
I wasn’t very good at SolidWorks before, but this project ended up being a perfect way to learn it from start to finish. Now I can create all kinds of mechanical models.
As for the PXIe rails, I’m not sure if you can buy them outside of China. I got mine on Taobao from a company that seems to specialize in PXIe and VXI chassis parts.
I used my DIY CNC setup to cut these rails. I haven’t written a post about it yet, but I guess I probably should.
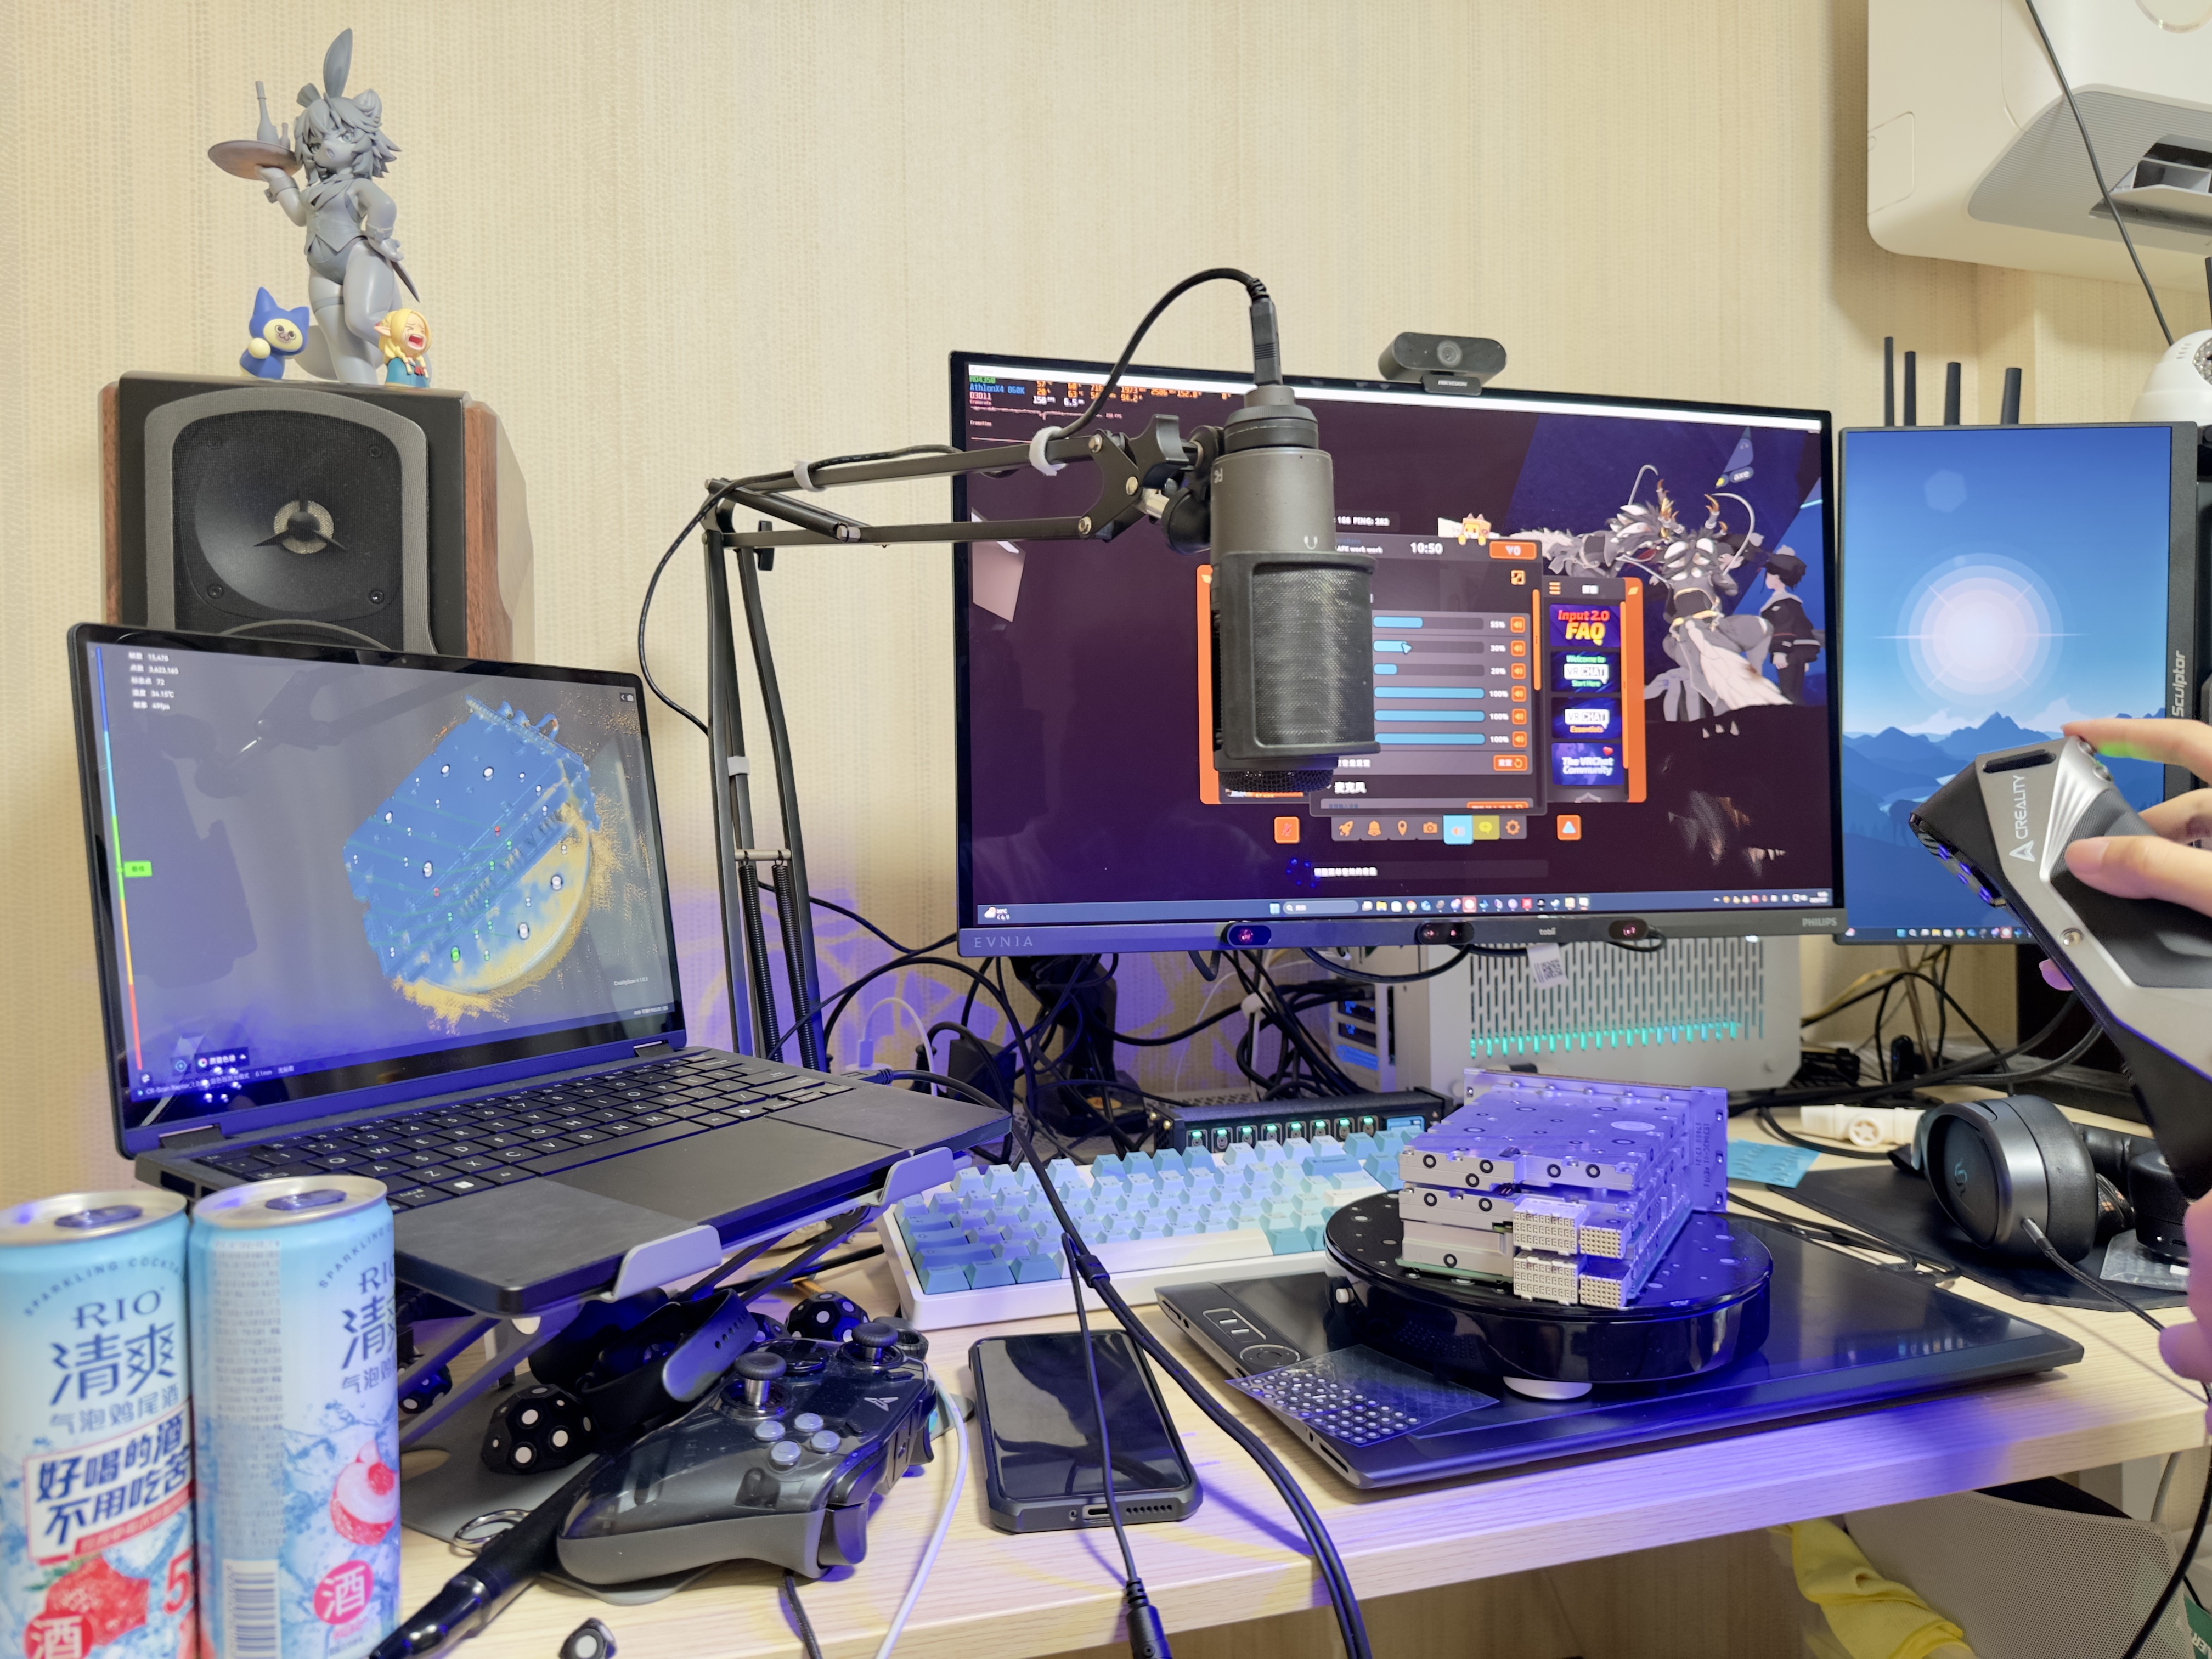
Install the NUC and cables
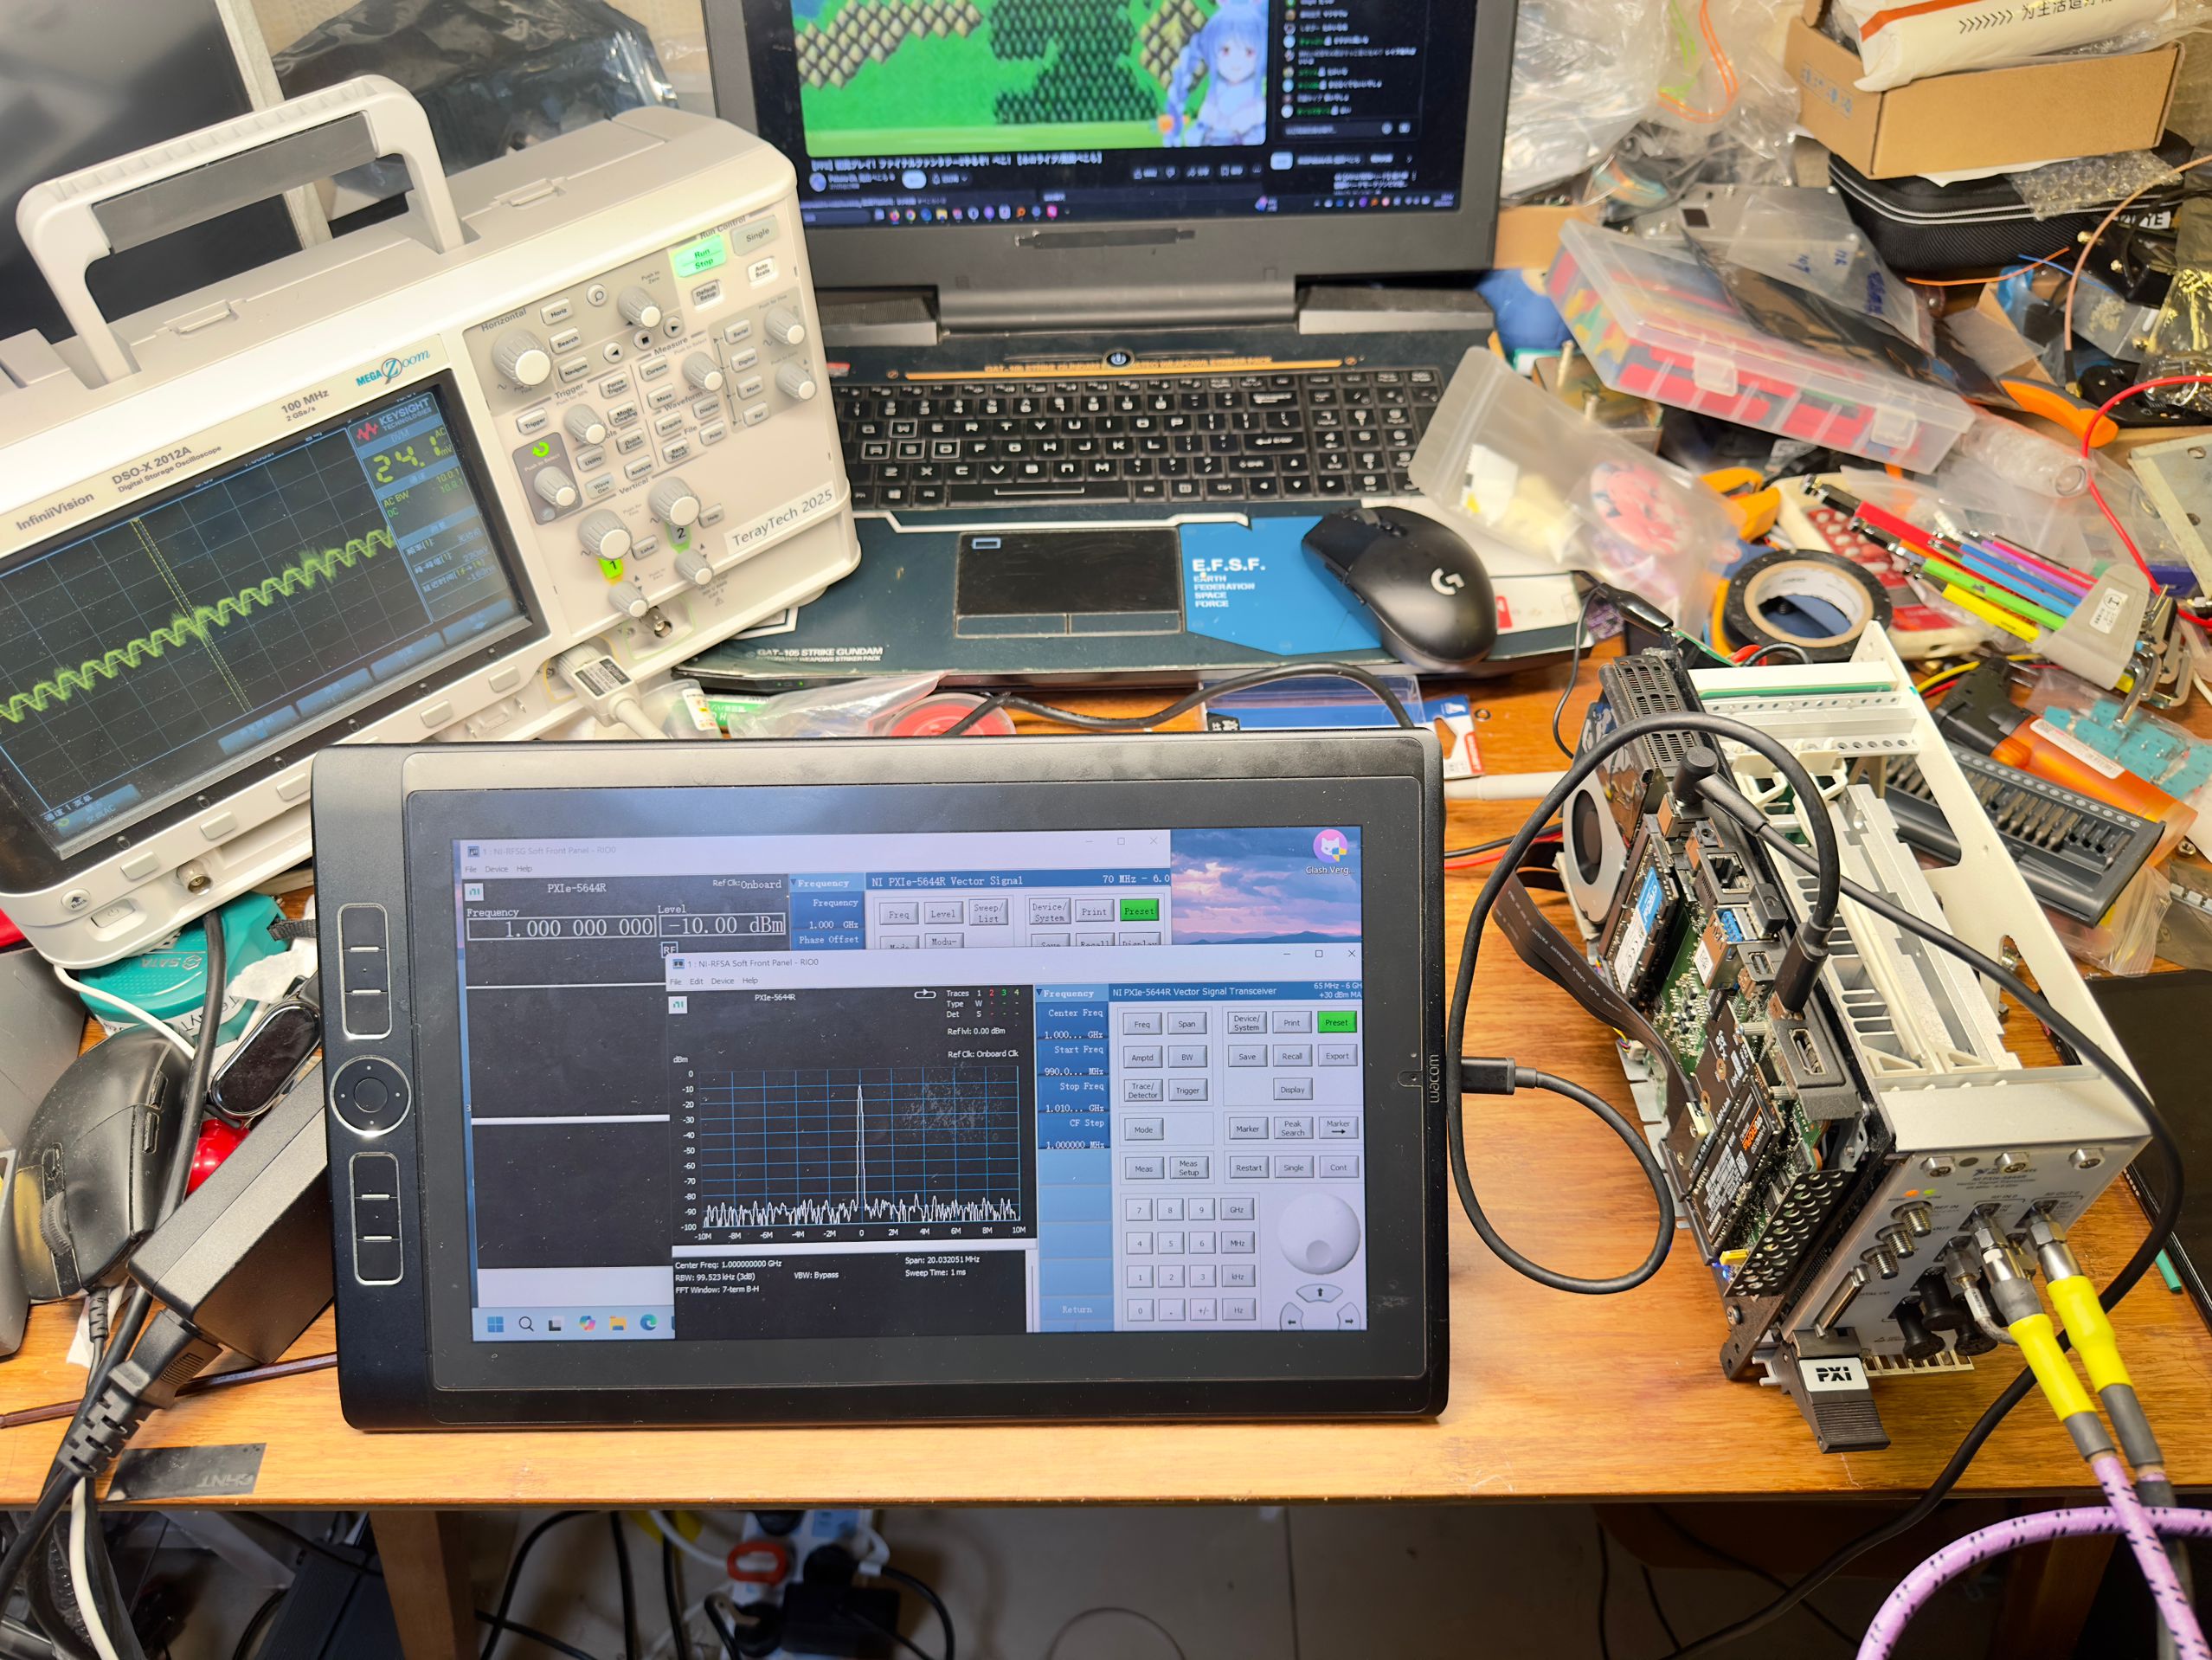
The first run was a success! I used a WACOM pen tablet as a touched display, only one cable from the thunderbolt port. The NI software doesn’t requires any license to run basic functions like signal gen or spectrum, only waveform creator needs licenses.
NI’s software comes with a package manager. There’s actually quite a lot of software you need to install, especially for LabVIEW related. Just make sure the version numbers match up correctly. (PEKO)
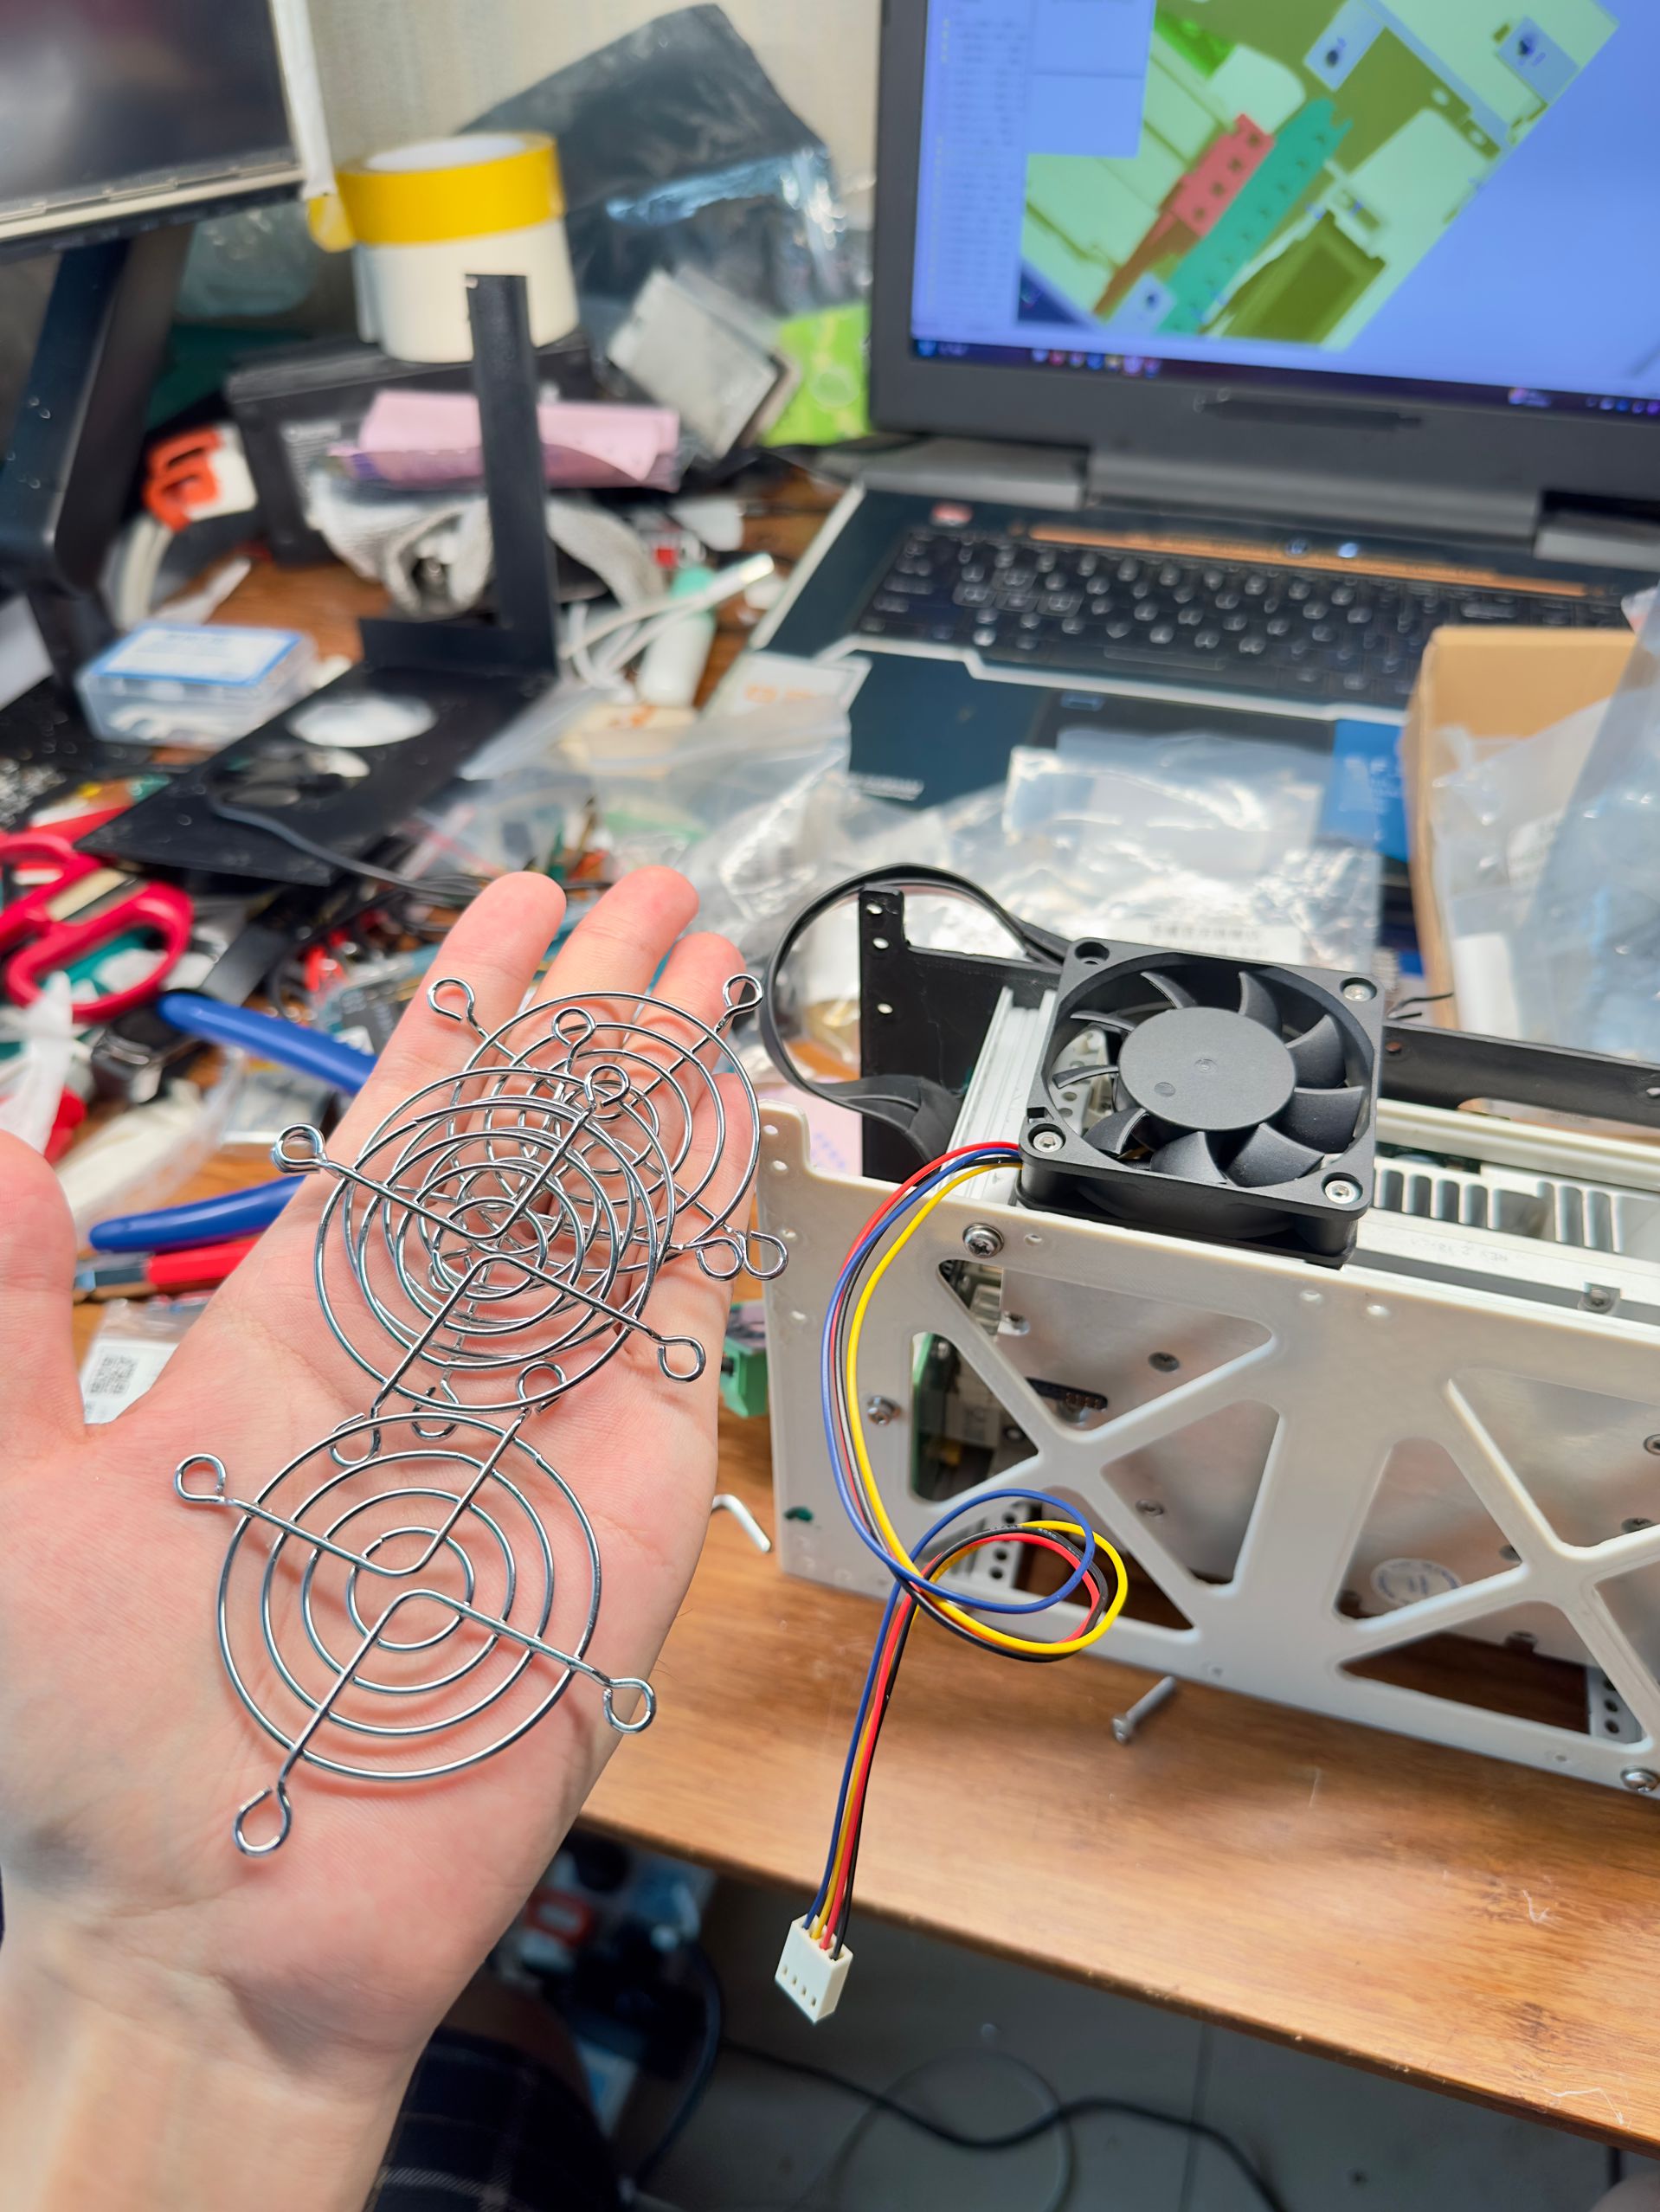
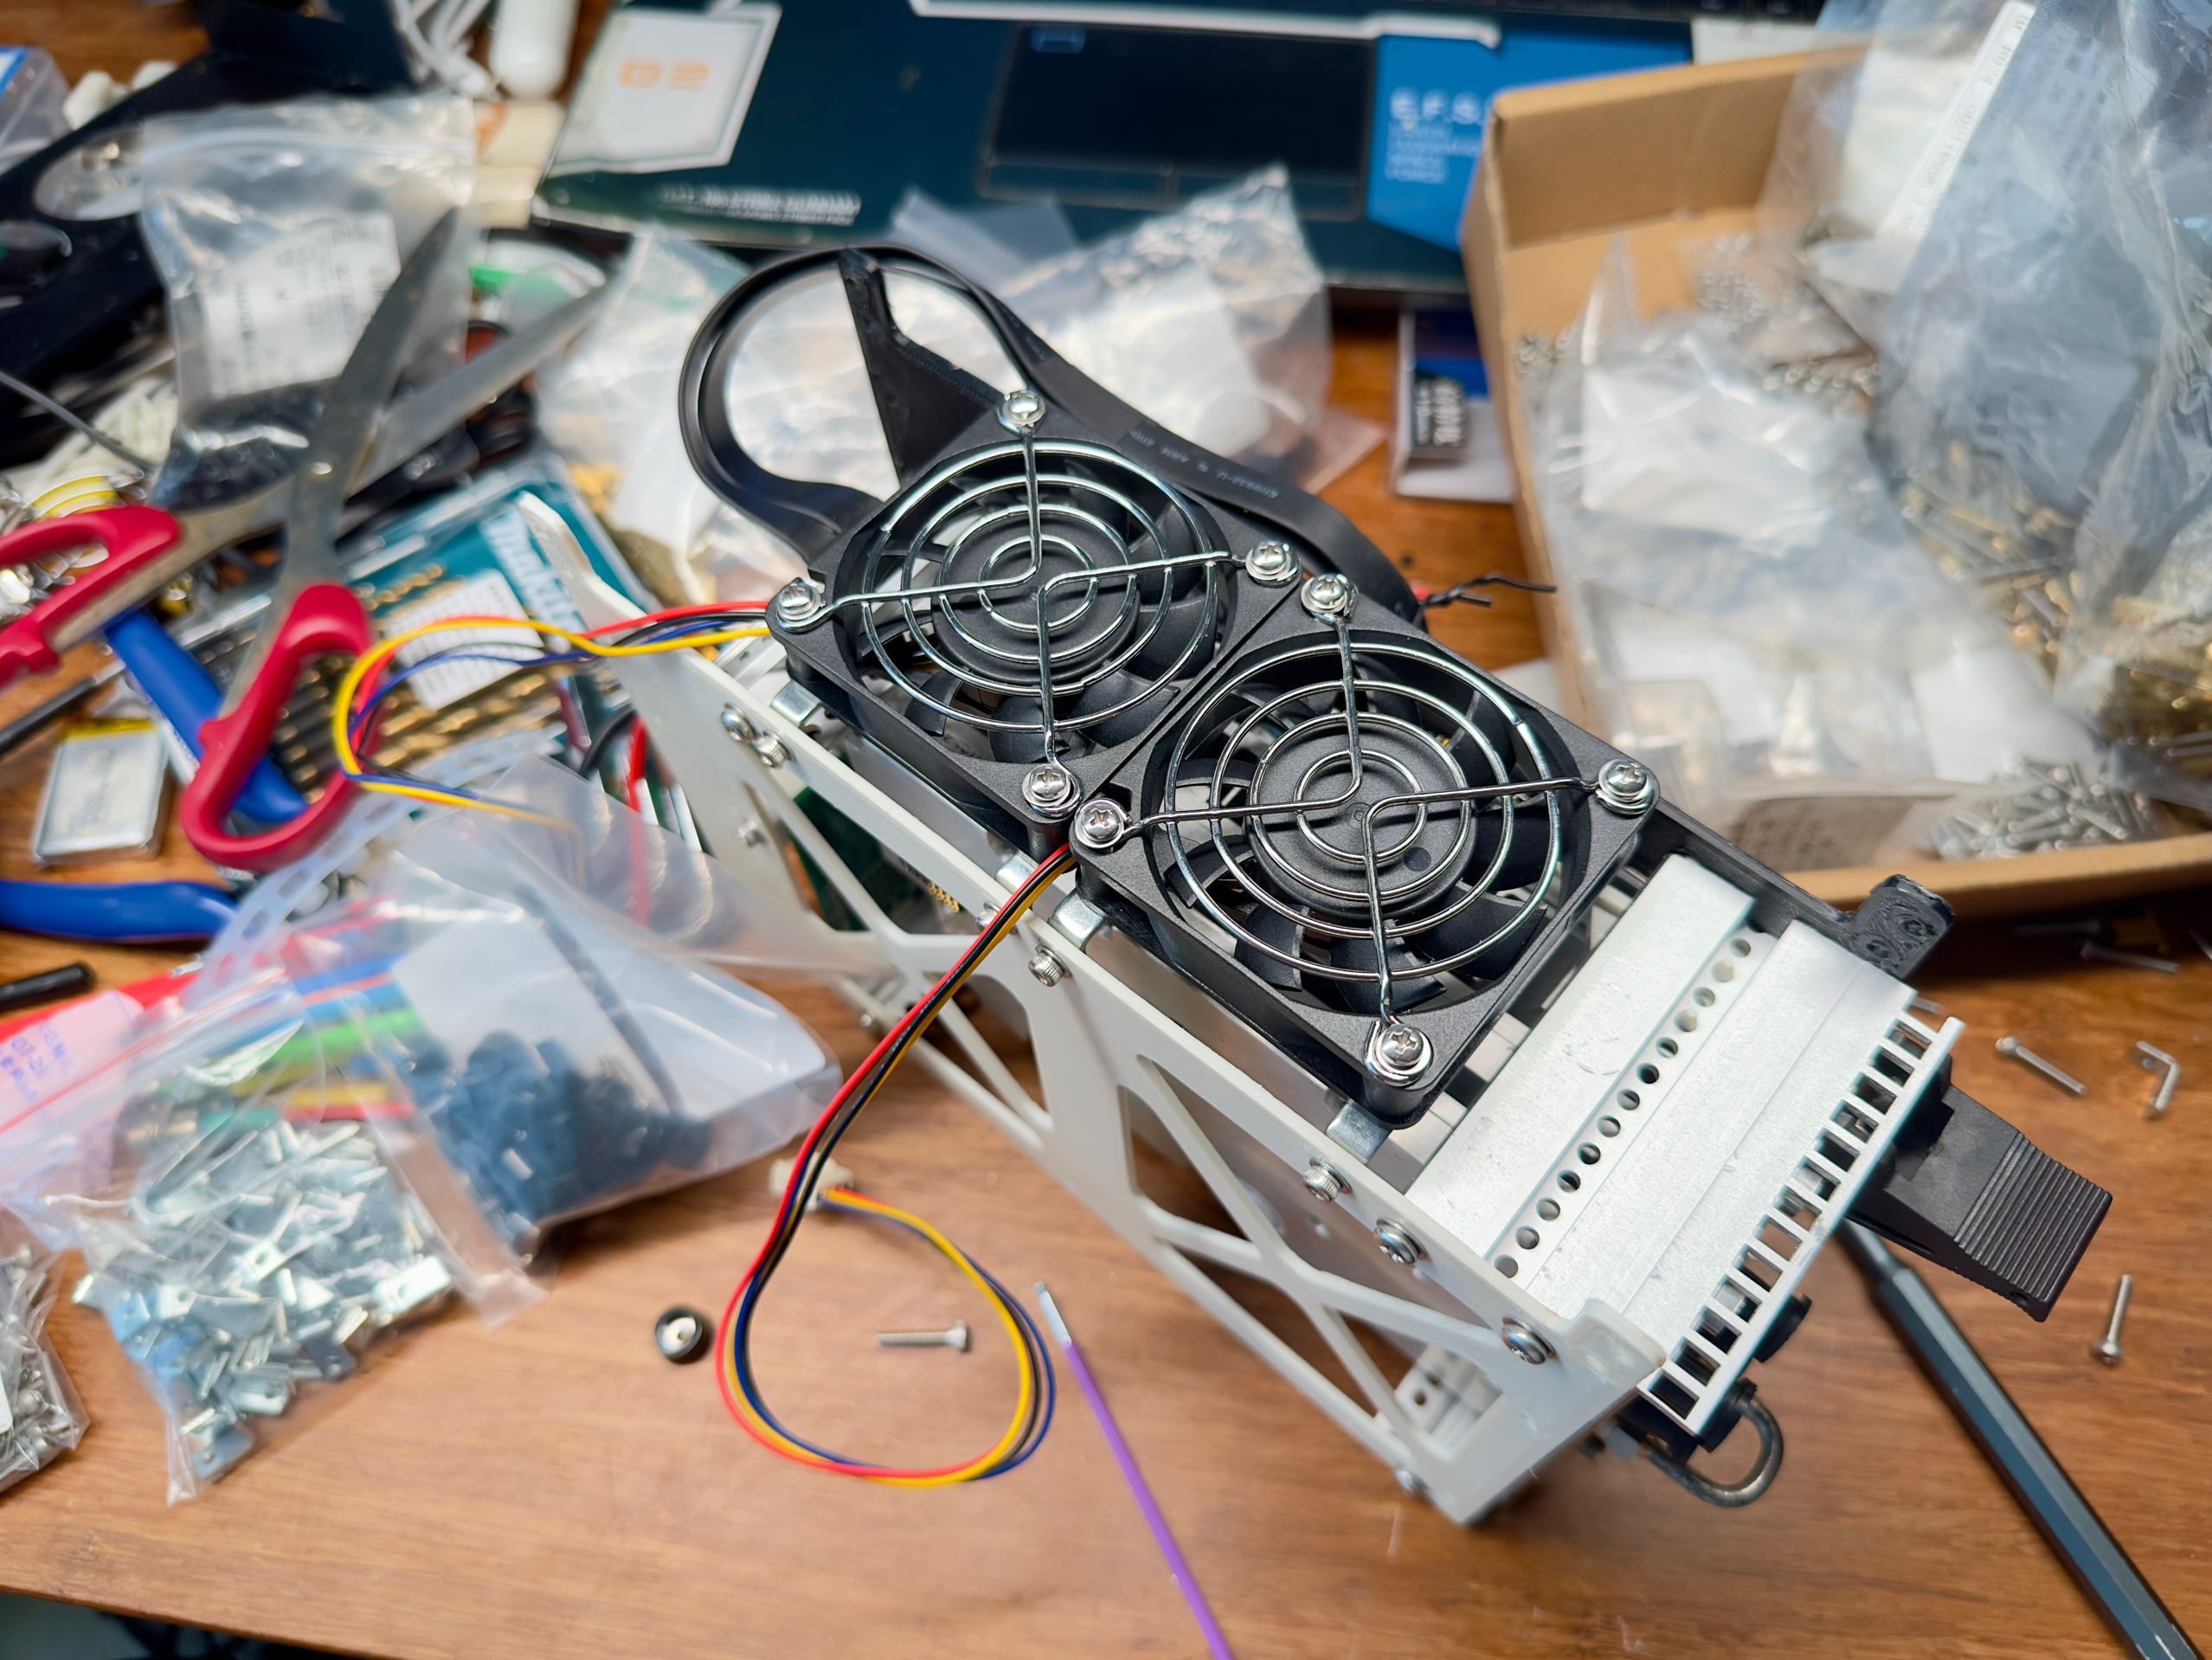
I went with a Delta 12V 0.36A fan with 4-wire PWM control. They can get pretty loud at full speed, but the airflow is excellent. A lot of people prefer Noctua fans since they’re incredibly quiet, but the price is just too high for me. I’d rather put my budget into more valuable parts of the build, so Delta was the practical choice.
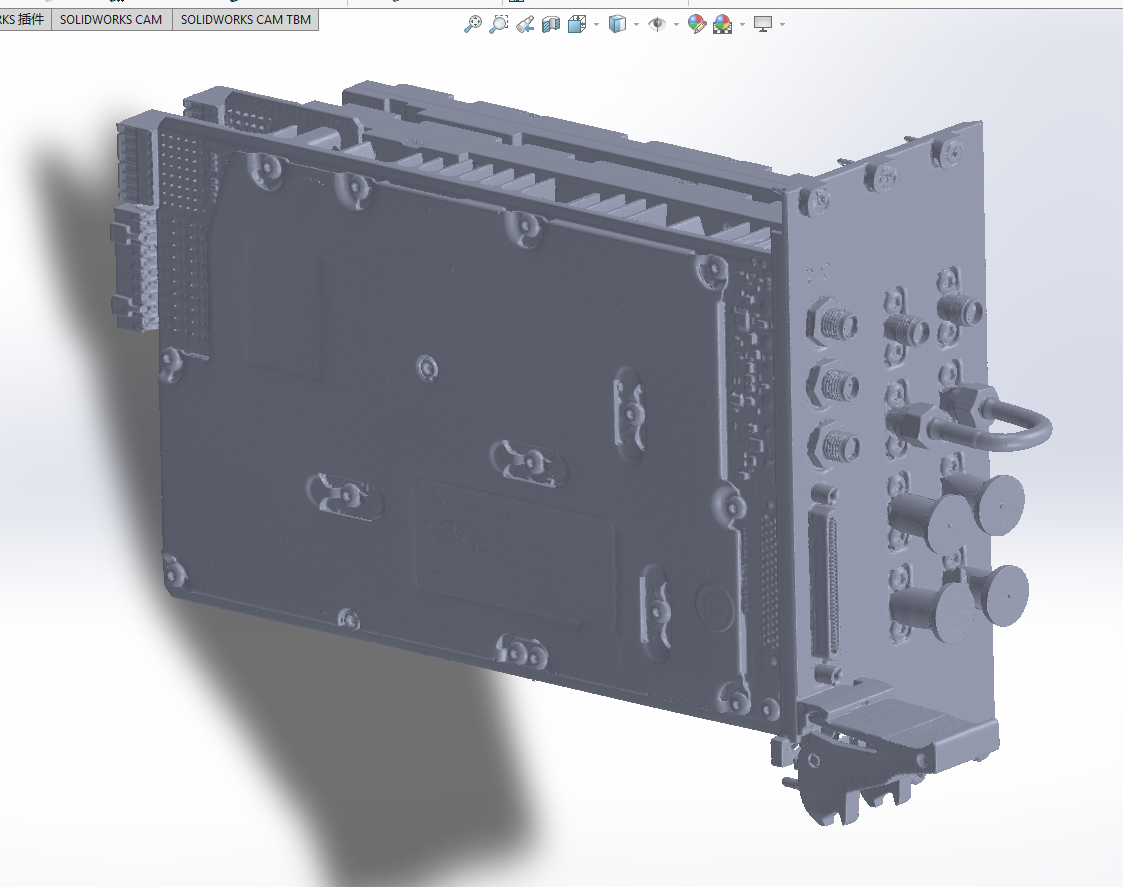
Then I kept refining the case modeling, and in the end, it looked like this.
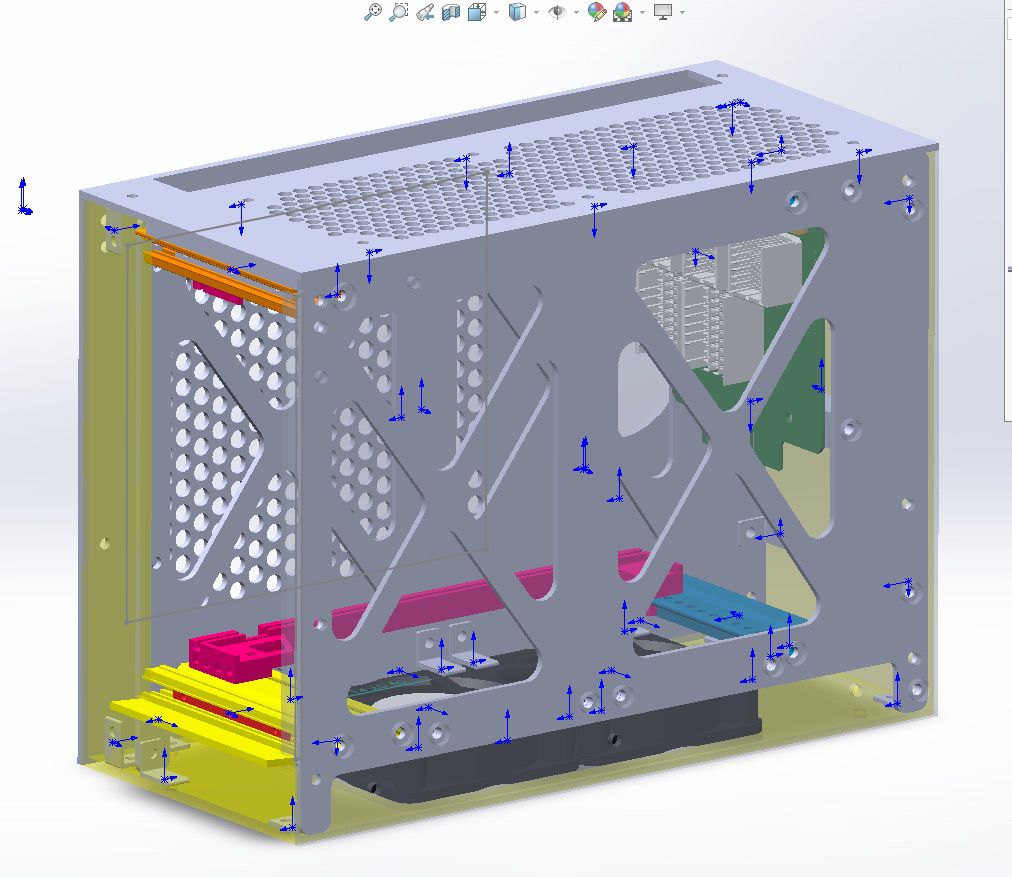
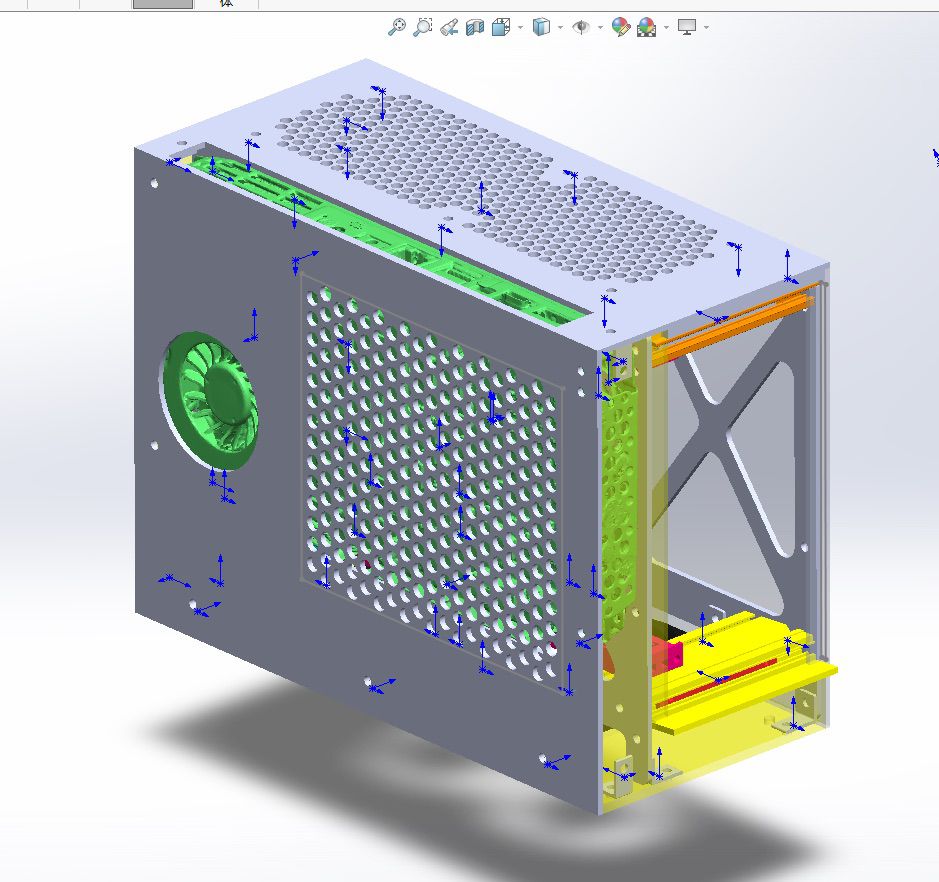
I added a ton of ventilation holes to these 3D-printed cases, with gaps of only about 1–2 mm. My 3D printer really had to struggle with this model, and it took quite a while, but the final result turned out really well.
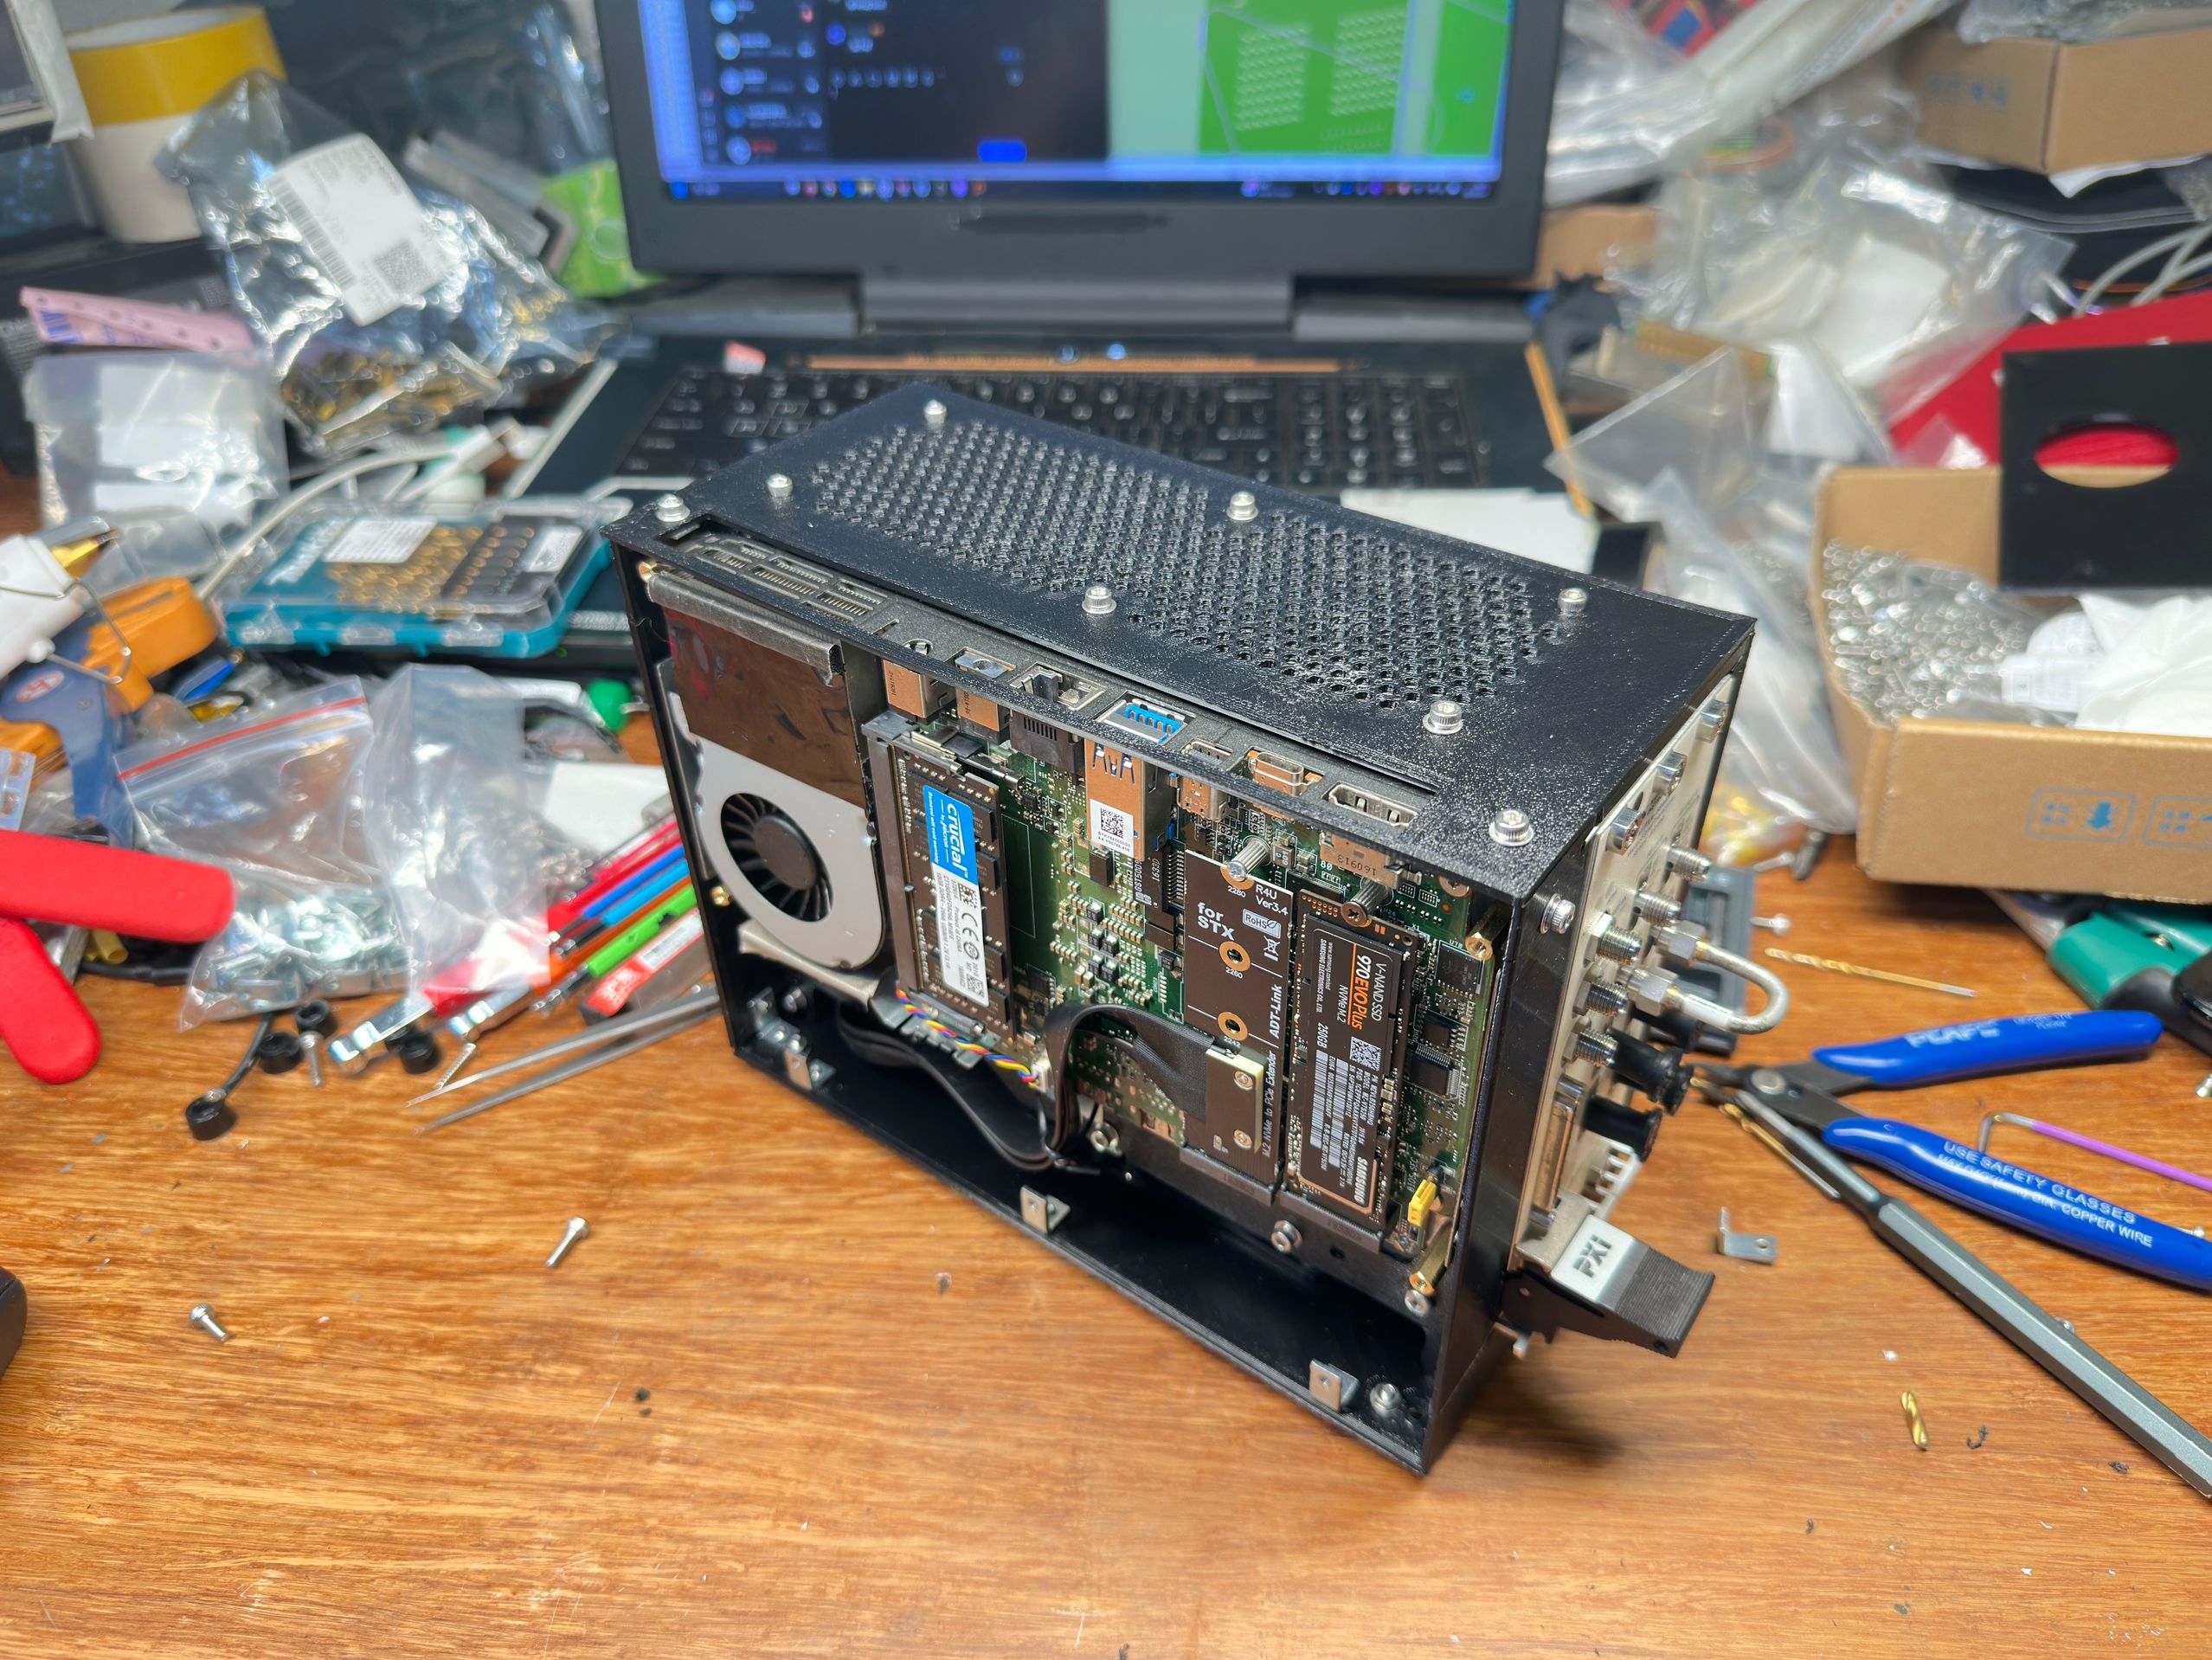
I used a ESP32C3 microcontroller to set and monitor the fan. It connects to the NUC via USB CDC. Coincidentally, the bottom side of the NUC happens to have two extra USB ports, so the USB cable can run inside the case without being exposed.
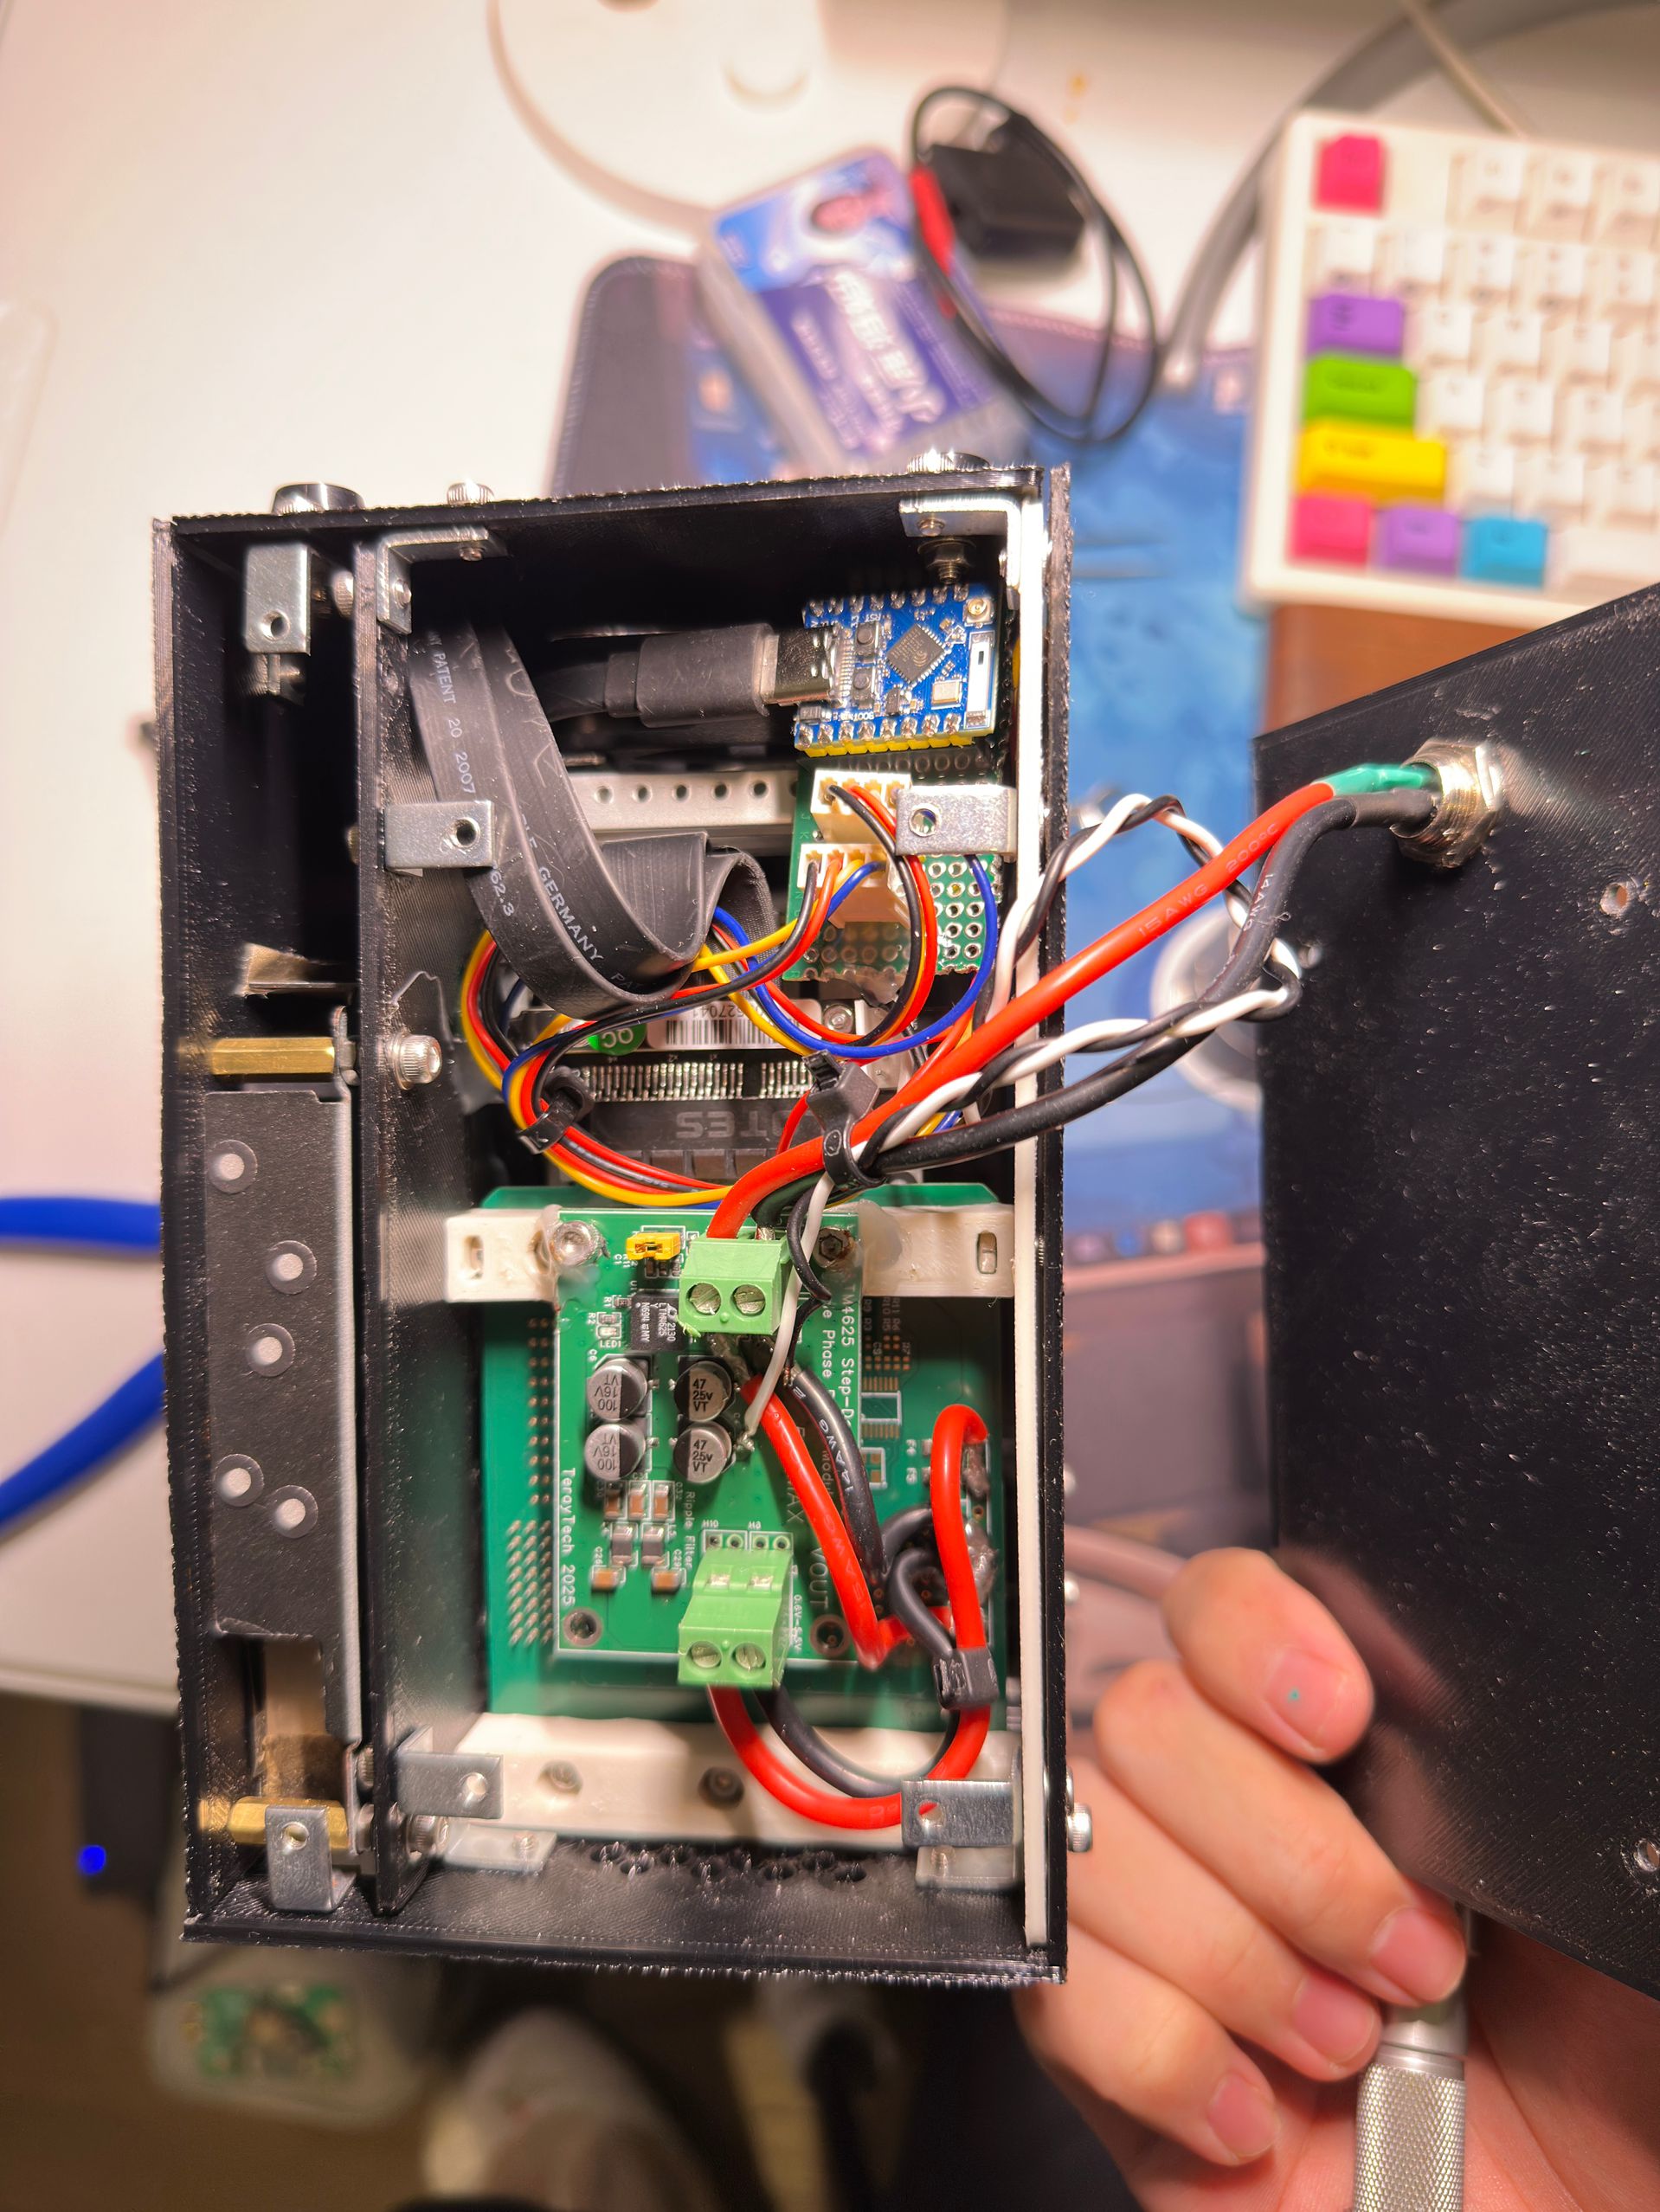
Finally, all the covers are assembled. Some exposed spots could easily be touched and could cause a short circuit, so I applied hot glue to the bare areas on the back of the board. It actually looks pretty decent, and works perfectly fine. During normal operation, the temperature stays around 40–50 °C, so there’s no risk of the hot glue melting.
Conclusion
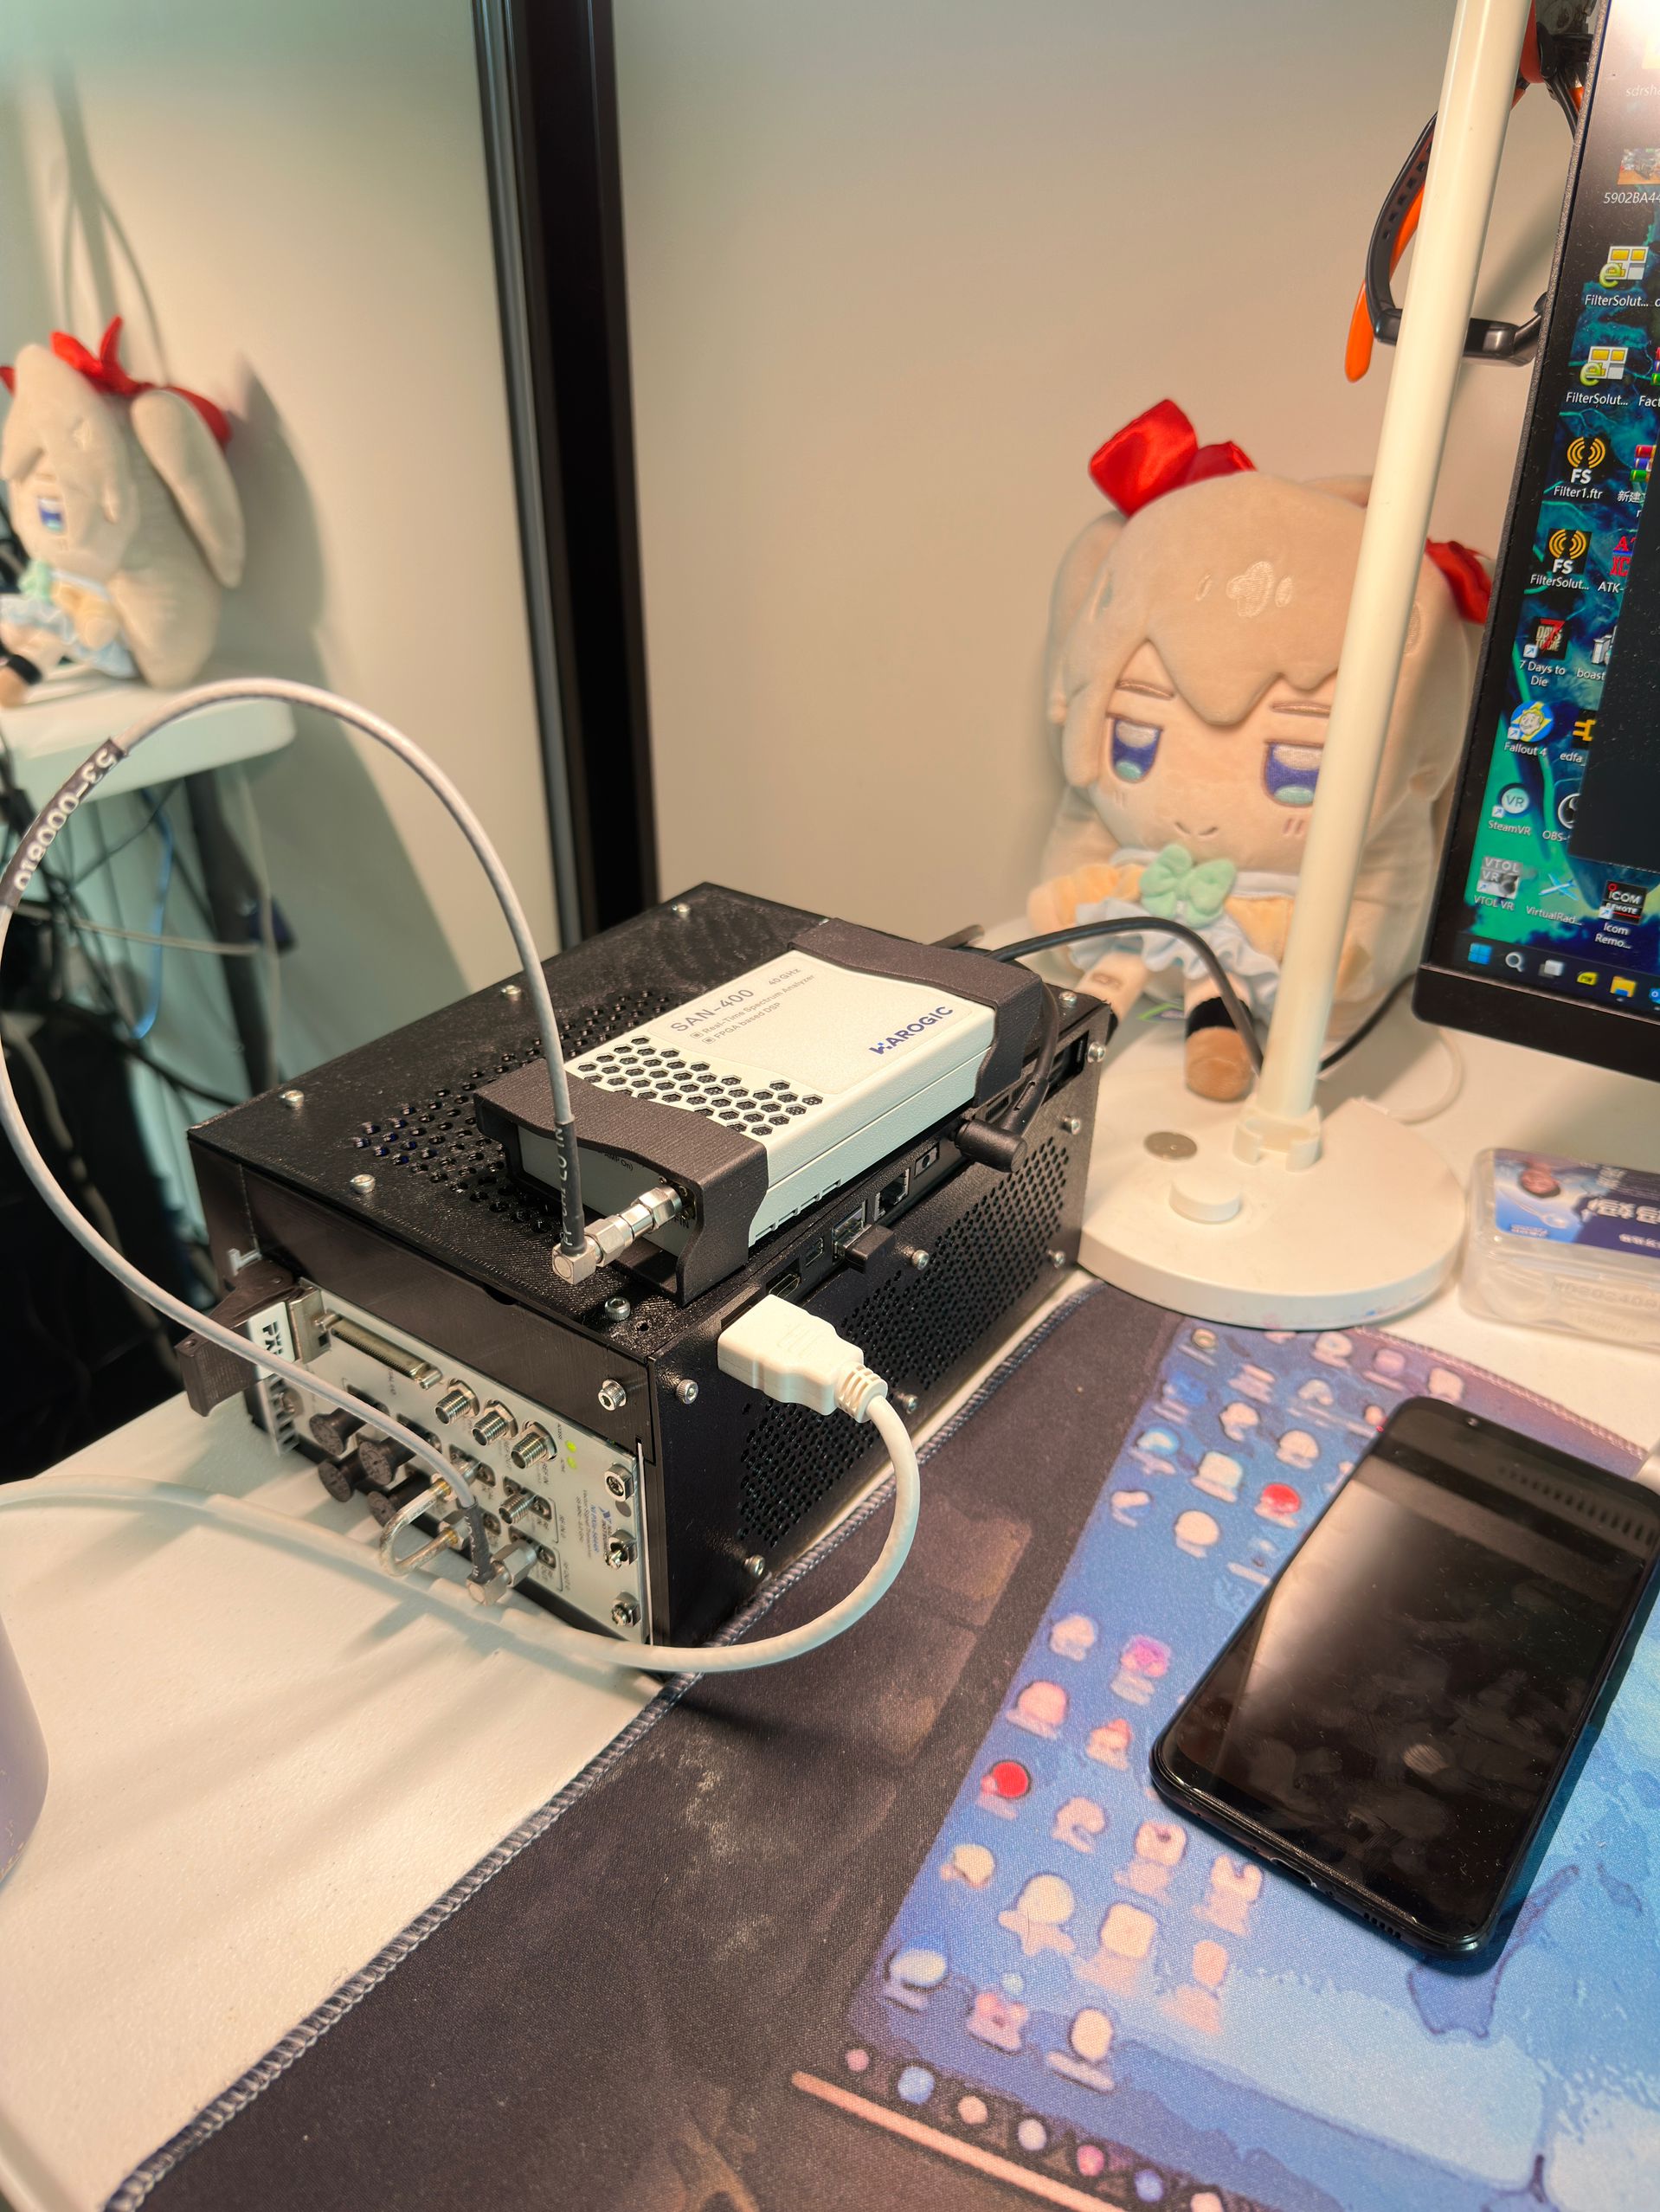
It fits nicely on my bench.
And that is the end of the building of my compact 5644R chassis.
For more detailed software and tests, I will move on to another post. Stay tuned and thanks for reading.